Installing the Framegrabber SDK#
If you want to operate only Basler cameras with your frame grabber, you can also use the pylon Software Suite.
Installing the Framegrabber SDK under Windows#
Info
Basler recommends uninstalling all Framegrabber SDK installations on your computer before you start installing the current version.
Prerequisites
To run the Framegrabber SDK setup, you need the following:
- Internet connection
- Administrator rights on your computer
To install the Framegrabber SDK under Windows:
-
Download the Framegrabber SDK setup from the Downloads Software section of the Basler website.
- If you have no restrictions on the size of the download package, use the standard setup Complete Installation for Windows 64bit (ver 5.x.x). This complete setup contains the Framegrabber SDK as well as the free applet sets for your frame grabber.
- If you prefer small download packages, select Setup Framegrabber SDK 5 for Windows 64bit (ver 5.x.x), which includes the Framegrabber SDK only. You can install the applet set for your frame grabber at a later stage of the installation process.
-
Start the Framegrabber SDK setup by double-clicking the file name.
- Select your preferred language for the setup dialogs.
-
The Checking Installed Versions dialog opens. It shows all existing installations of the Framegrabber SDK on your computer, as well as the active installation:
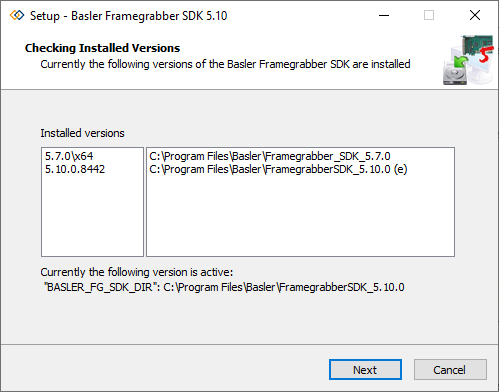
The active installation is the Framegrabber SDK installation you last installed on your computer. The environment variable %BASLER_FG_SDK_DIR% points to this installation. This isn't necessarily the latest version of the software. After finishing the installation process, the environment variable points to the new installation.
-
The License Agreement dialog opens.
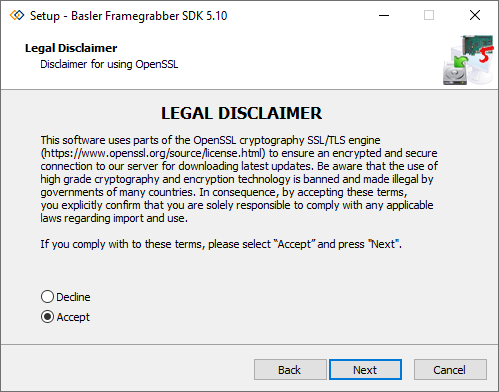
In this dialog, you must accept the legal terms and conditions. If you are unsure, click Decline.
Accepting allows you to make use of the Update feature, which allows you to check for new Framegrabber SDK versions in microDiagnostics.
If you click Accept and Next, a download of two OpenSSL libraries starts that are used to open a SSL/TLS secured connection to Basler's server.a
-
The Select Destination Location dialog opens.
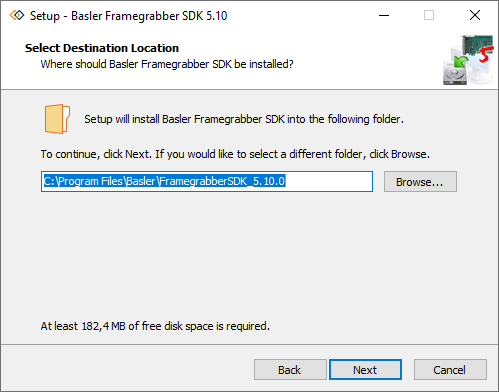
Select the installation directory and click Next.
Access Rights Required
Make sure you choose an installation directory to which you have full write access rights, even after the installation process is finished.
-
The Select Components dialog opens. Select the installation mode you want to use. Full Installation is the default mode.
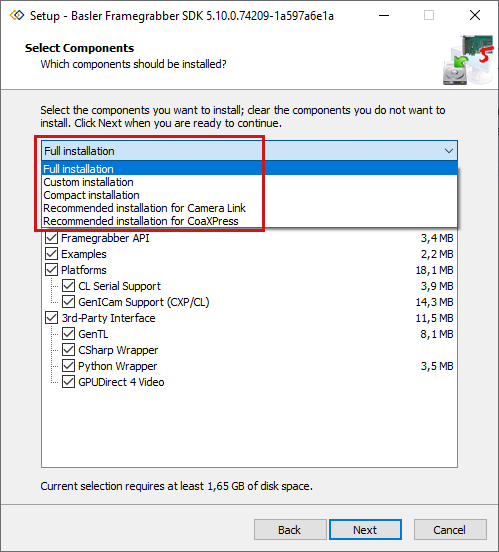
- In Full Installation mode, all components are selected by default. When you clear one of the components, the setup switches to Custom Installation mode.
- In Custom Installation mode, all components are selected by default. To save disk space, you can clear the components you don't need.
If you want to configure your cameras via the Basler GenICam interface, make sure you select Platforms/ GenICam support. - In Compact Installation mode, all components are cleared by default. You can freely select which components you want to install. Depending on your selection, the installed Framegrabber SDK may not be functional. When you select one of the components, the setup switches to Custom Installation mode.
Click Next.
-
The Select Start Menu Folder dialog opens.
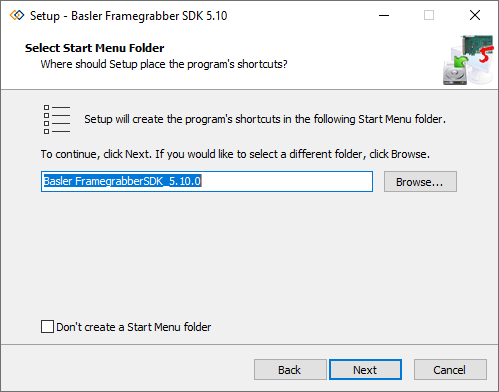
Select a directory for the tool shortcuts and click Next.
-
The Select Additional Tasks dialog opens.
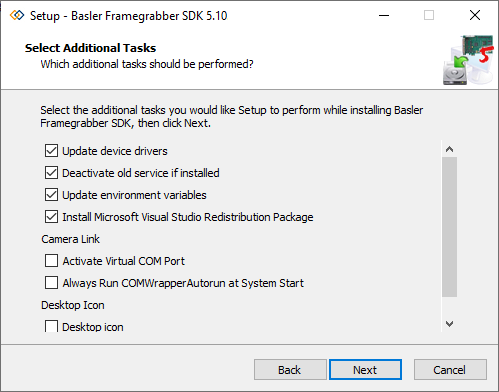
Select the additional tasks you want to have carried out during installation and click Next.
-
The Ready to Install dialog displays your installation configuration and all components you have selected for installation.
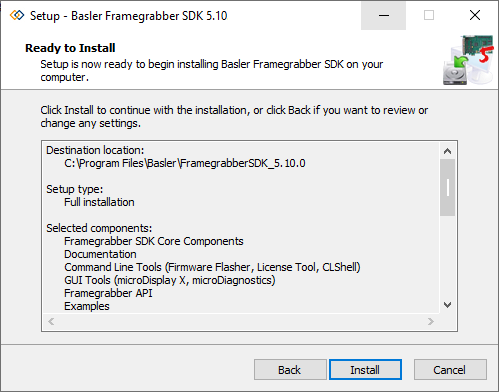
If you are ready to install the Framegrabber SDK, click Install.
-
The Installing dialog opens. The Framegrabber SDK, the drivers, and all related software tools are installed on your system.
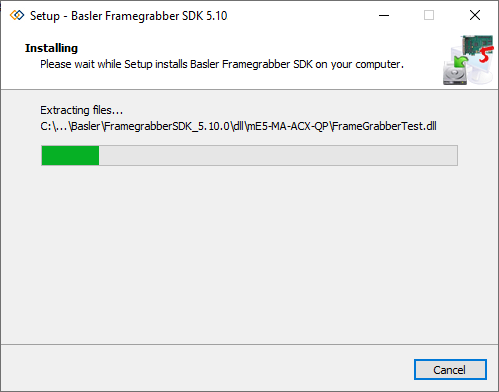
If you are asked for driver installations, Basler recommends to accept and install the drivers for your hardware.
-
The Completing the Basler Framegrabber SDK Setup Wizard dialog opens.
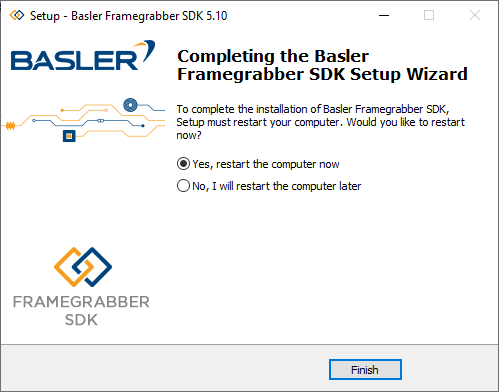
You must restart your computer before you can use the Framegrabber SDK.
After installing the Framegrabber SDK, frame grabbers are recognized in the Windows Device Manager under Multifunction adapters with their full device name.
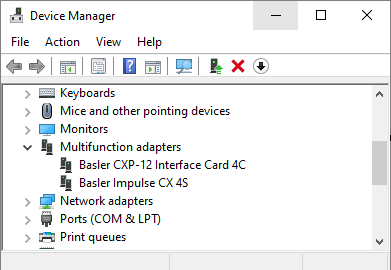
For imaWorx CXP-Quad only
If you selected a Framegrabber SDK standalone setup, you should install the applets after installing the Framegrabber SDK.
You can also install a newer applet set version containing enhanced or new applets and use it with your existing Framegrabber SDK installation.
Download the updated applet setup from the Downloads Software section on the Basler website.
Silent Installation under Windows#
The Framegrabber SDK setup supports silent installation. The setup program accepts optional command line parameters. These can be useful for system administrators or other programs calling the setup program.
Setup Command Line Parameters#
/SILENT, /VERYSILENT
Instructs the setup to be silent or very silent.
- Silent setup: The wizard and the background window aren't displayed, but the installation progress window is visible on screen.
- Very silent setup: The wizard and the background window aren't displayed. The installation progress window also isn't displayed.
Other parts of the setup aren't changed, e.g., error messages during installation are displayed, as well as the start screen. You can disable the start screen using DisableStartupPrompt or the /SP- command line option.
If a restart is necessary and the /NORESTART command (see below) isn't used:
- Silent setup: A Reboot now? message box is displayed.
- Very silent setup: The system reboots without asking.
/SUPPRESSMSGBOXES
Suppresses message boxes. This command line parameter has only an effect when combined with /SILENT or /VERYSILENT.
The following defaults are used:
- 'Keep newer file?' Yes
- 'File exists, confirm overwrite.' No
- Abort/Retry: Abort
- Retry/Cancel: Cancel
- DiskSpaceWarning / DirExists/ DirDoesntExist/ NoUninstallWarning / ExitSetupMessage / ConfirmUninstall: Yes (=continue)
- FinishedRestartMessage / UninstalledAndNeedsRestart: Yes (=restart)
The following message boxes aren't suppressible:
- "About Setup" message box
- "Exit Setup?" message box
- "FileNotInDir2" message box, which is displayed when setup requires a new disk to be inserted and the disk was not found.
- Any (error) message box displayed before setup (or uninstall) that could read the command line parameters.
- Any message box displayed by the MsgBox support function.
/LOG="filename"
Same as /LOG, except that this parameter allows you to specify a fixed path or filename to use for the log file. If a file with the specified name already exists, it will be overwritten. If the file can't be created, setup will abort with an error message.
/NORESTART
Instructs setup not to reboot even if a reboot is necessary.
/DIR="x:\dirname"
Overrides the default directory name displayed on the Select Destination Location wizard page. A fully qualified pathname must be specified.
/GROUP="folder name"
Overrides the default directory name displayed on the Select Start Menu Folder wizard page. If the DisableProgramGroupPage directive was set to "yes", this command line parameter is ignored.
/NOICONS
Instructs setup to initially check the Don't create a Start Menu Folder check box on the Select Start Menu Folder wizard page.
/COMPONENTS="comma separated list of component names"
Overrides the default component settings. Using this command line parameter causes the setup to automatically select a custom type. If no custom type is defined, this parameter is ignored.
Only the specified components will be selected. The rest will be cleared. If a component name is prefixed with a "*" character, any child components will be selected as well, except for those that include the dontinheritcheck flag. If a component name is prefixed with a "!" character, the component will be cleared.
This parameter doesn't change the state of components that include the fixed flag.
Usage:
<BASLER_INSTALLER_EXE.exe>/Components = "<component1>,<component2>"
Available components:
| Component | Description |
|---|---|
| core | Install core components (required) |
| tools_cli | Install command line tools |
| tools_gui | Install GUI tools |
| doc | Install documentation |
| dev\core | Install libs and header files |
| dev\examples | Install SDK examples |
| dev\examples_source | Install the source code of the examples |
| dev\examples_bin | Install example binaries |
| dev\cmake | Install cmake files |
| acq_applets | Install AcquisitionApplets for microEnable frame grabbers |
| acq_applets\me5maacl | Install frame-grabber specific AcquisitionApplets for mE5 marathon ACL |
| acq_applets\me5mavcl | Install frame-grabber specific AcquisitionApplets for mE5 marathon VCL |
| acq_applets\me5maacxqp | Install frame-grabber specific AcquisitionApplets for mE5 marathon ACX QP |
| acq_applets\iwcxp12q | Install frame-grabber specific AcquisitionApplets for mE6 imaWorx CXP-Quad |
| UpdateEnvironment | Update of the environment variables |
| CompCLStandardVersion_2 | Install CLser as defined in Camera Link 2.0 |
| Com_0_Com | Install virtual null modem |
| bin_libs | Install libs into the system directory |
| redist_package | Install redistributable packages |
Notes:
- Multiple components are applied by a comma separated list.
- The list may not contain any blanks.
/TASKS="comma separated list of task names"
Specifies a list of tasks that should be initially selected.
Only the specified tasks will be selected. The rest will be cleared. Use the /MERGETASKS parameter instead if you want to keep the default set of tasks and only select some of them.
If a task name is prefixed with a "*" character, any child tasks will be selected as well, except for those that include the dontinheritcheck flag. If a task name is prefixed with a "!" character, the task will be cleared.
Usage:
<BASLER_INSTALLER_EXE.exe>/Tasks = "<task1>,<task2>"
Available tasks:
| Task | Description |
|---|---|
| taskDesktopicon | installs a desktop icon |
| taskDrvInstall64 | update of the device drivers |
Example for a silent installation:
FramegrabberSDK_Setup_v5.x_Win64.exe

/components= core,tools_cli,acq_applets\iwcxp12q
cl /silent
Installing the Framegrabber SDK under Linux#
The Framegrabber SDK needs to be installed on the host computer to run your frame grabber.
Info
Basler recommends to uninstall all Framegrabber SDK installations on your computer before you start installing the current version.
To install the Framegrabber SDK, the following steps are required:
- Install the device driver for your frame grabber (Installing the Driver)
- Install the software components and documentation (Installing the Software Components under Linux)
- Adapt the system environment (Adapting the Environment)
Info
The Framegrabber SDK environment is designed for machine vision applications with particular focus on durable systems.
Ubuntu with LTS support and Red Hat Enterprise Linux offer a longer life cycle and a longer maintenance period than other Linux distributions. The Framegrabber SDK doesn't use a distribution-dependent implementation and should work on other distributions as well. Choose the distribution that is best suited for your application.
Requirements#
To install and use the Framegrabber SDK, you need the following components:
- Kernel version: 5.0 or higher
- Distributions: Ubuntu LTS 22.04 (min. 18.04, max. 22.04)
- glibc2.0
- zlib version: 1.2.3 or higher
- libtiff version: version 4.0.9 or higher
- C-Compiler: tested with gcc 8 or higher
- dkms Linux package
Info
Ubuntu LTS 22.04 is the Linux distribution and version supported by the Framegrabber SDK version 5.10 or higher. All other Linux distributions may require additional configuration work by the user and can be supported by Basler Support only to a limited extent.
Further Prerequisites#
Root User Access Rights: For installing the Framegrabber SDK, you need the according access rights on the system. Therefore, you must be able to either use sudo or log in as root for certain steps of the installation process.
Frame Grabber Hardware: To install the Framegrabber SDK components, you don't need to install a Basler frame grabber or interface card. Nevertheless, available hardware makes it a lot easier to verify if an installation has been successful.
Known Issues#
Compatibility notice for Linux kernels 4.5 or newer:
The Linux kernel starting with version 4.5 allows a stricter management of PCI resources via setting CONFIG_IO_STRICT_DEVMEM. The current Framegrabber SDK will not work when this setting is enabled. This is a known issue on some Linux distributions. To work around this issue, boot the Linux kernel with the iomem=relaxed option, or recompile the kernel with CONFIG_IO_STRICT_DEVMEM=n.
Compatibility notice for UEFI Secure Boot:
If you install Linux on an UEFI machine using the Secure Boot option enabled in the UEFI settings, drivers might need to be signed. Currently, the Framegrabber SDK's Linux driver doesn't support signing during the build process. Signing requires for the user to create a certificate, sign the driver using the certificate and install the certificate into the UEFI certificate store. There are several How-Tos that can be found online if you want to sign the driver yourself. The easiest workaround, however, is to disable the UEFI Secure Boot feature in your mainboard settings.
Notice on install-time error messages:
When you install the driver on modern Linux distributions, you may encounter error messages referring to driver signing. You can safely ignore those error messages if the UEFI Secure Boot feature is disabled in your mainboard settings.
Installation Components#
The installation of the Framegrabber SDK consists of three components:
- Driver package
- Software components and documentation package
- Installation script
Driver package: The driver is distributed as source code and has to be compiled and installed before usage. The file name of the device driver package is menable_linuxdrv_src_x.x.x.tar.bz2.
The driver package is part of the software components and documentation package (see below). Alternatively, you can download it from the Basler website (search for "Setup Drivers for Linux 64bit").
Software components and documentation package: The package contains all software components and the documentation. The components come as ready-to-use binary files. You can use the installation script to extract and copy the files to their final destinations within the file system.
The file name of the software and documentation package is: basler-fgsdk5-x.x.x-linux-amd64.tar.bz2.
Amongst others, the following software components are included:
- Framegrabber API libraries as library (*.so)
- Applets (*.so)
- Header files and linker libraries (.h and .a) of the Framegrabber API
- Tools (command line and GUI tools for support, diagnosis and parametrization)
- Firmware files for the individual frame grabber types and models (*.hap)
- Documentation
Installation script: To facilitate the installation of the software components, a shell script is delivered which copies the software components to the installation folder and makes entries in the system environment (see below for details). The file name of the installation script is: basler-fgsdk5-5.x.x-linux-amd64-setup.sh.
Installing the Driver for Frame Grabbers#
Before using a frame grabber, you need to install the driver for frame grabbers. To install the driver, the following steps are required:
- Extract the driver source code files (the drivers are distributed as source code in a *.tar.bz2 archive)
- Compile and link the driver sources
- Load the driver
- Set the access rights
On many Debian-based Linux distributions (e.g. Ubuntu), you can skip these steps and use the Debian package to install the driver instead:
-
Double-click the driver, which is located at /basler-fgsdk<version_number>-linux-amd64/driver/menable-dkms_*.deb. or use the following command:
sudo apt-get install /basler-fgsdk5-5.10.0.75002-linux-amd64/driver/menable-dkms_*.deb -
Reboot your system to load the driver.
Info
In addition to the following instructions, you may also refer to the INSTALL file included in the *.tar.bz2 archive. It contains a detailed description of the driver installing procedure, and tips for troubleshooting.
If you encounter problems during driver installation, read the troubleshooting tips in the INSTALL file.
Info
During installation, error messages might occur that refer to driver signing starting with "SSL error" or "sign-file". You can ignore these messages, if the UEFI Secure Boot feature is disabled in your mainboard settings.
Extracting the Driver Sources#
To extract the driver source files:
- Open a command line.
-
Change to the directory where you want to extract the sources to.
Info
Make sure the path to the directory you want to use for compilation of the source files contains no spaces. The kernel build scripts accept no spaces in a path.
-
Start extracting the driver sources by entering the tar xjvf menable_linuxdrv_src_5.0.0.tar.bz2 command.
Compiling and Linking the Driver Sources#
To compile and link the driver:
- Open a command line.
- Change to the directory where you unpacked the driver sources.
-
Enter the following commands:
cd linuxmake && sudo make install -
Provide your password when asked.
All necessary files are built and installed.
Loading the Driver#
To load the driver, enter command sudo modprobe menable.
If you have a frame grabber plugged into your system, you can check if the driver is loaded and fully functional by entering dmesg | grep menable.
Setting the Access Rights#
After the driver has been loaded, the frame grabbers can only be accessed by users that have administrative access rights.
Info
Basler recommends to assign all users you want to be able to access the driver to the group "video".
To assign users to the group "video", enter the sudo usermod -aG video <username> command. Replace <username> with the name of the user.
After a reboot of the system, the changes in group membership are active. The user is now able to fully use the frame grabbers.
Driver Entries#
Entries by the driver are written into the file /etc/udev/rules.d/10-siso.rules.
Additional Helpful Commands for Setting Up the Driver#
| Command | Result | Application Area |
|---|---|---|
| insmod | Show loaded modules and accessing programs | Diagnosis |
| modinfo modinfo <modulename> | Show information on loaded modules | Diagnosis |
| modprobe Loading: modprobe –a <modulename> Unloading: modprobe –r <modulename> | Load or unload modules including implicit dependencies | Loading and unloading manually |
| depmod | Enter information on module dependencies into file /lib/module/<Kernelversion>/modules.dep so that module can be loaded automatically during system start. | Important step during installation |
| - | Load module automatically during system start: Entry in file /etc/modules | Important step during installation |
Installing the Framegrabber SDK under Linux Using the Installation Script#
Read here how to install the Framegrabber SDK under Linux using the installation script via shell.
Info
If you use the shell script as described below, you will have to enter some installation-relevant data during installation. Alternatively, you can use the according call parameters of the installation script.
Use the command [prompt] sudo ./[NameOfFramegrabberSDKInstallerFile]-h to get an overview listing all available installation parameters, together with their preset default values. The order in which you enter the parameters is of no relevance.
To install the Framegrabber SDK using the shell script in the default location:
- Boot the system.
- Go to the directory that contains the Framegrabber SDK setup. You will have been provided with the following setup file: basler-fgsdk5-5.x.x-linux-amd64-setup.sh
- Enter
[prompt] sudo ./
Info
Make sure you have full administrative access to the folder where you want to install the Framegrabber SDK in (e.g., as a root user). You must be able to execute files within this installation folder.
Make sure the file can be executed. If not, use the chmod command. You can change access permissions so that they correspond to the required setting by using the chmod command: sudo chmod +x [NameOfFramegrabberSDKInstallerFile]
This will install into the default location /opt/SiliconSoftware.
Alternatively, if you want to install the Framegrabber SDK in a different location:
-
Use the
-dcommand to specify the directory where you want to install the Framegrabber SDK in (without a slash at the end of the path):[prompt] ./[NameOfFramegrabberSDKInstallerFile] -d [PathToTargetDirectory]Now, the target directory you specified is displayed.
-
Confirm the target directory by entering yes.
Info
Alternatively to the last steps, you can also specify an installation directory and directly affirm your choice.
To do so, add an
-yafter the installation command:[prompt] ./[NameOfFramegrabberSDKInstallerFile] -d [PathToTargetDirectory] –y -
Depending on where you install the Framegrabber SDK, you might have to elevate the access rights by calling the setup with
sudo.
Now, the installation process is started:
The setup file will be unzipped into the directory you specified.
- The extracted files will be modified in so far as absolute paths are being set.
- After successful installation, the absolute paths are displayed in the shell.
If you want to read the full installation log, go to the installation directory (using the cd command) and enter [prompt] cat install.log.txt
Now, the content of the installation log file install.log.txt is displayed in the shell.
Adapting the Environment#
After installing the Framegrabber SDK, the environment variables have to be set. You can either do this automatically, or manually.
Setting Important Environment Variables Manually#
After (re)installation of the Framegrabber SDK, at least one environment variable needs to be updated: BASLER_FG_SDK_DIR.
The variable BASLER_FG_SDK_DIR must point to the installation directory where the Framegrabber SDK is installed.
-
Set
BASLER_FG_SDK_DIRby using the following command:export BASLER_FG_SDK_DIR=/opt/Basler/FramegrabberSDK5.x.xIn this example,
/opt/Basler/FramegrabberSDK5.x.xis the directory where the Framegrabber SDK is installed. Specify the path to the installation directory according to your file system. -
Set the GenICam environment for the Framegrabber SDK:
export GENICAM_ROOT=$BASLER_FG_SDK_DIR export GENICAM_CACHE_V3_1=$BASLER_FG_SDK_DIR/genicam/cache export GENICAM_LOG_CONFIG_V3_1=$BASLER_FG_SDK_DIR/genicam/log/config/SisoLogging.properties -
To locate the corresponding modules PATH and LD_LIBRARY_PATH, use the following commands:
export GENICAM_ROOT=$BASLER_FG_SDK_DIR

export LD_LIBRARY_PATH=$BASLER_FG_SDK_DIR/lib:$BASLER_FG_SDK_DIR/bin/impl:$LD_LIBRARY_PATH
Info
When using Ubuntu 18.04 LTS or later or Red Hat Enterprise Linux 7.1 or later, you can make these entries for the current terminal in file
/etc/profile
or
~/.profile
Adapting the Environment Variables Automatically#
After installing the Framegrabber SDK, the environment variables have to be set. This can be done automatically. In this case, you have to start the process.
Info
Environment variables are only set when they don't exist yet. If the same environment variable already exists, it is extended.
- To start the automatic setting of the necessary environment variables, enter
[prompt] source <INSTALLDIR>setup-fgsdk-env.sh.
Upon pressing ENTER, all environment variables required for using the Framegrabber SDK are set to the appropriate values automatically. - You can read which environment variables have been set, and which values are being used. To read the according file, enter
[prompt] cat <INSTALLDIR>setup-fgsdk-env.sh.
Now, the content of the file is displayed in the shell.
Setting User Access Rights#
Basler recommends to grant full access rights to all users to the directories
<INSTALLDIR>/bin/log <INSTALLDIR>/genicam/cache
To grant anyone in the group video write access, call
sudo chown -R root:video <INSTALLDIR>/bin/log

sudo chmod -R g+w <INSTALLDIR>/bin/log

sudo chown -R root:video <INSTALLDIR>/genicam/cache

sudo chmod -R g+w <INSTALLDIR>/genicam/cache
Only when write access is enabled, the Framegrabber SDK can place log files in these directories. Without sufficient access rights, some tools and features may not work properly (e.g., microDiagnostics).
Placing the Applet Files#
To use VisualApplets (*.hap) files created by VisualApplets, copy the (*.hap) files into this folder:
<INSTALLDIR>/Hardware Applets/<Platform>
<PLATFORM> refers here to the hardware platform, e.g, imaWorx CXP-12 Quad or Interface Card IC-2C.
VisualApplets (*.hap) files enhance the image processing functionality of the frame grabber.
Deinstalling the Framegrabber SDK under Linux#
To deinstall the Framegrabber SDK under Linux, you have to deinstall the drivers and the software components.
Deinstalling the Driver#
To uninstall the driver manually, enter the following commands in a terminal:
sudo rmmod menable.ko

sudo rm /etc/udev/rules.d/10-siso.rules

sudo rm /sbin/men_path_id /sbin/men_uiq

sudo rm `find /etc/modules -name menable.ko`
Info
Note that ` above must be a backtick, usually entered as an accent grave. Alternatively, you can:
- Enter the
findcommand separately, - Specify the path of
menable.ko, and then - Call
sudo rmusing the specified path.
Deinstalling Software Components#
To deinstall software components of the Framegrabber SDK:
- Delete all files in the corresponding install directory.
- Undo all manual changes you made to the system.
-
The download of the OpenSSL libraries will be run using a secured connection running standard Windows libraries for network traffic encryption. ↩