Tonal Range#
如果要自动调整色调范围,请使用 Tonal Range Auto 功能。
如果要使用线性或 S 曲线函数调整对比度,请使用 Brightness and Contrast 功能(如果可用)。
该功能的使用#
调整对比度#
信息
Basler 建议优先使用 Tonal Range Auto 功能。之后,您可以按照以下说明微调对比度。
要手动调整对比度:
- 确保相机已生成出色的图像,并且仅存在对比度低或色彩偏移等问题。色调范围操作只能在已经具有良好图像质量的图像上执行。
优化图像质量时,请按照以下提供的顺序操作。 - 将
TonalRangeEnable参数设置为On。 - 将
TonalRangeSelector参数设置为Sum。 - 将
TonalRangeSourceDark和TonalRangeTargetDark参数设置为暗源和目标值。
如果暗目标值低于暗源值,则对比度增加。 - 将
TonalRangeSourceBright和TonalRangeTargetBright参数设置为亮源和目标值。
如果亮目标值大于亮源值,则对比度增加。
校正色彩偏移#
信息
Basler 建议优先使用 Tonal Range Auto 功能。之后,您可以按照以下说明微调色彩校正。
要手动纠正色彩偏移:
- 确保相机已生成出色的图像,并且仅存在对比度低或色彩偏移等问题。色调范围操作只能在已经具有良好图像质量的图像上执行。
优化图像质量时,请按照以下提供的顺序操作。 - 将
TonalRangeEnable参数设置为On。 - 根据要校正的色彩偏移,将
TonalRangeSelector参数设置为Red、Green或Blue。
示例:如果您的图像呈绿色调,则将参数设置为Green。 - 将
TonalRangeSourceDark、TonalRangeTargetDark、TonalRangeSourceBright和TonalRangeTargetBright参数设置为可将当前直方图与其他直方图对齐的源和目标值。
图像优化顺序#
如果要优化图像质量,请按照以下顺序操作,以避免产生副作用:
- 使用 Exposure Time、Black Level 和 Gain 功能执行基本图像优化。确保图像不会过度饱和。
- 如果您使用的是彩色相机,请使用 Light Source Preset、Balance White Auto 或 Balance White 功能。
- 使用 Tonal Range Auto 和 Tonal Range 功能优化对比度和/或颜色。
运作原理#
通过查看图像中色调分布的图形化表示(即图像直方图),可以更好地理解色调范围操作。
Basler pylon Viewer 提供了直方图窗格,这在执行色调范围操作时会非常有用。
信息
根据相机上启用的其他功能,pylon Viewer 中的直方图窗格可能不会显示色调范围功能实际使用的数据。
例如,Gamma 功能是在色调范围操作后处理的。因此,Gamma 校正包含在 pylon Viewer 中显示的直方图中,但不包含在 Tonal Range 功能使用的数据中。
源和目标值#
对比度和色彩调节均基于将源值映射到目标值的相同概念。
为了说明这一点,可以将源值视为直方图中的“锚点”,将目标值视为锚点要移至的点。
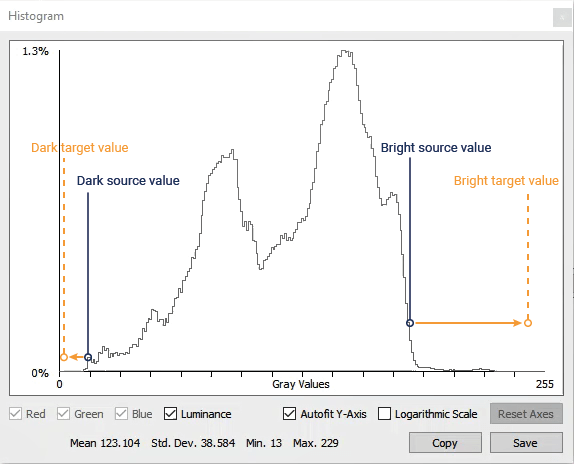
当源值映射到目标值时,整个直方图会相应地扩展或拉伸:
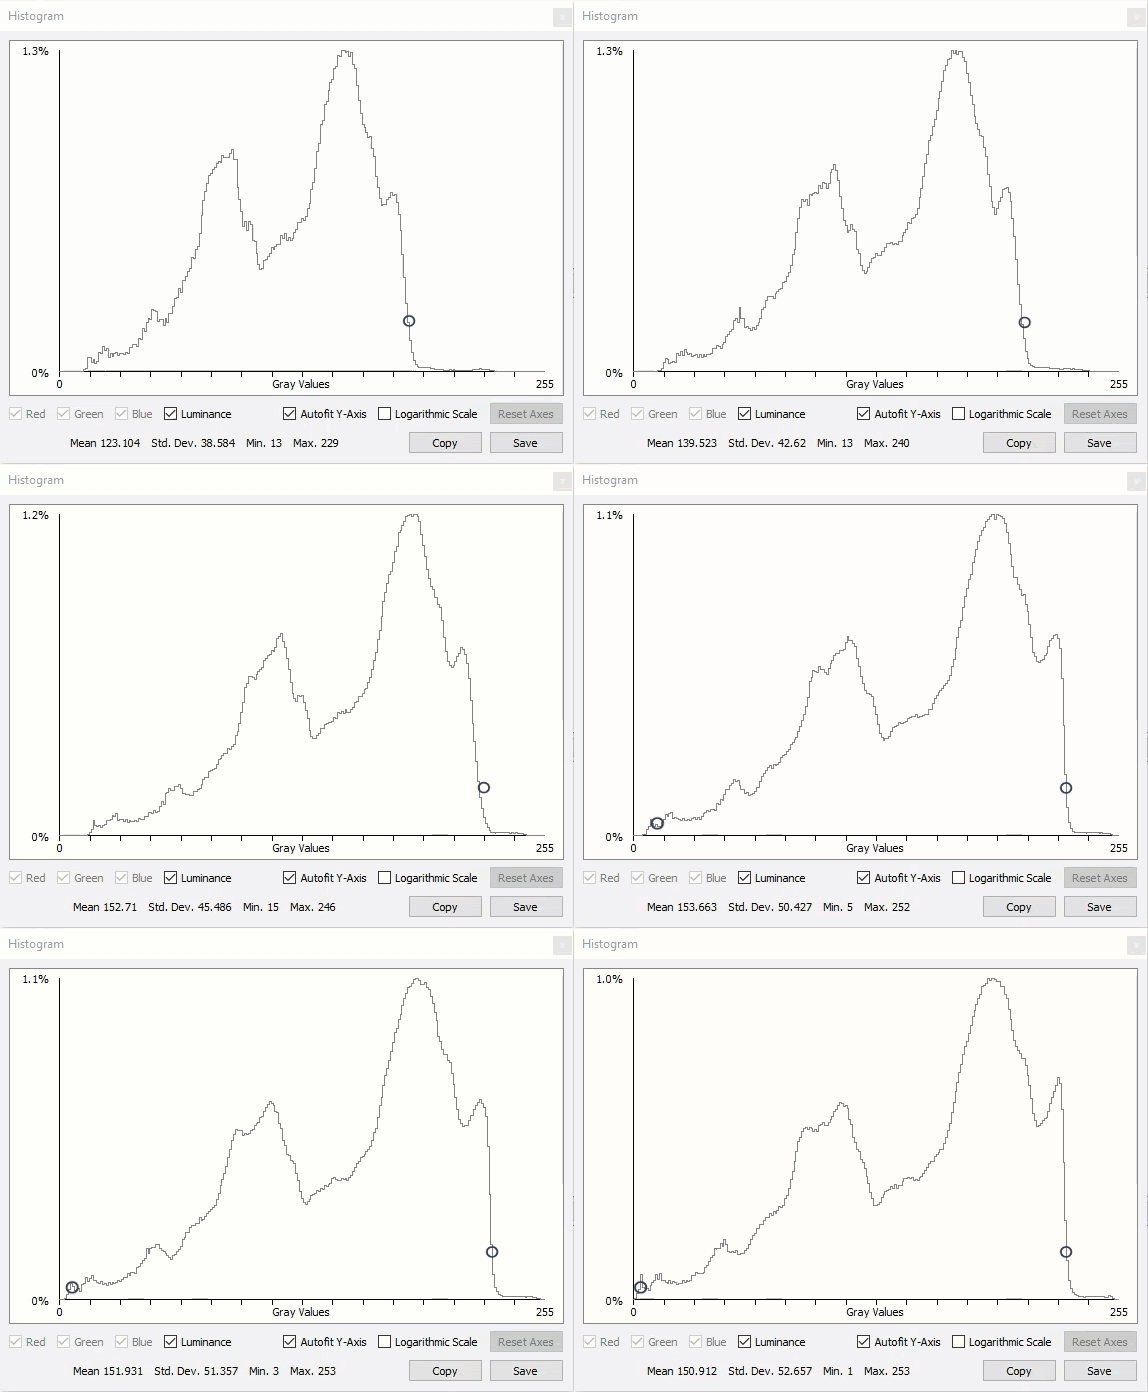
暗/亮源和目标值#
如上所示,必须定义两组源和目标值才能执行色调范围操作:
- 位于直方图下端的暗源和目标值。
您可以使用TonalRangeSourceDark和TonalRangeTargetDark参数指定这些值。 - 位于直方图上端的亮源和目标值。
您可以使用TonalRangeSourceBright和TonalRangeTargetBright参数指定这些值。
所有源和目标值的范围均可从 0 到最大像素值(例如,如果设置了 12 位像素格式,则为 4095)。由于直方图拉伸和扩展的程度受到限制,因此参数范围也可能受到限制。
对比度调整(单色和彩色相机)#
在所有支持Tonal Range 功能的相机上,您都可以使用该功能调整对比度。
低对比度图像的色调范围较窄:
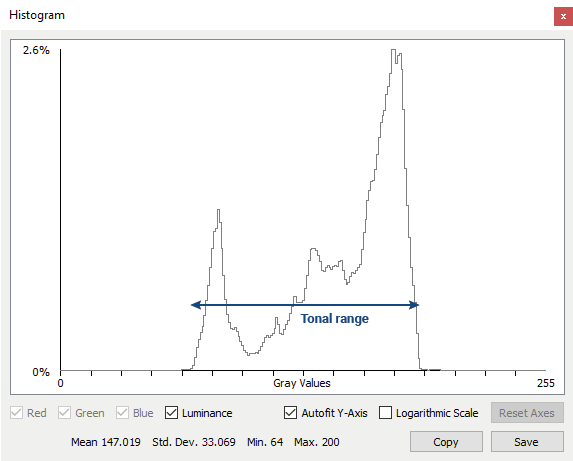
Tonal Range 功能可让您手动加宽色调范围,从而增加对比度。
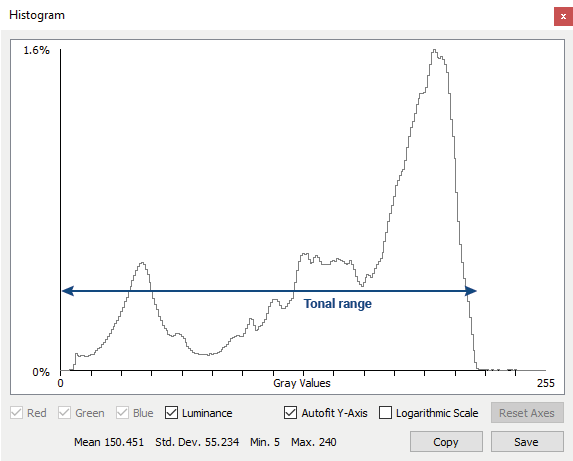
通过将暗源值映射到较低的目标值,将亮源值映射到较高的目标值,可以扩大色调范围。
两个源值之间的区域定义了中间色调,即您认为对图像至关重要的像素值。
要自动执行此过程,请使用 Tonal Range Auto 功能。
色彩校正(仅限彩色相机)#
在支持 Tonal Range 功能的彩色相机上,您也可以使用该功能纠正色彩偏移。
如果图像中的颜色发生偏移,则三个 RGB(红、绿、蓝色)直方图将显示为未对齐。例如,如果您的图像存在偏红色调,则红色直方图将显示在比绿色和蓝色直方图更靠右的位置(请参见下面的示例)。
Tonal Range 功能使您可以手动对齐 RGB 直方图,从而减少色彩偏移。
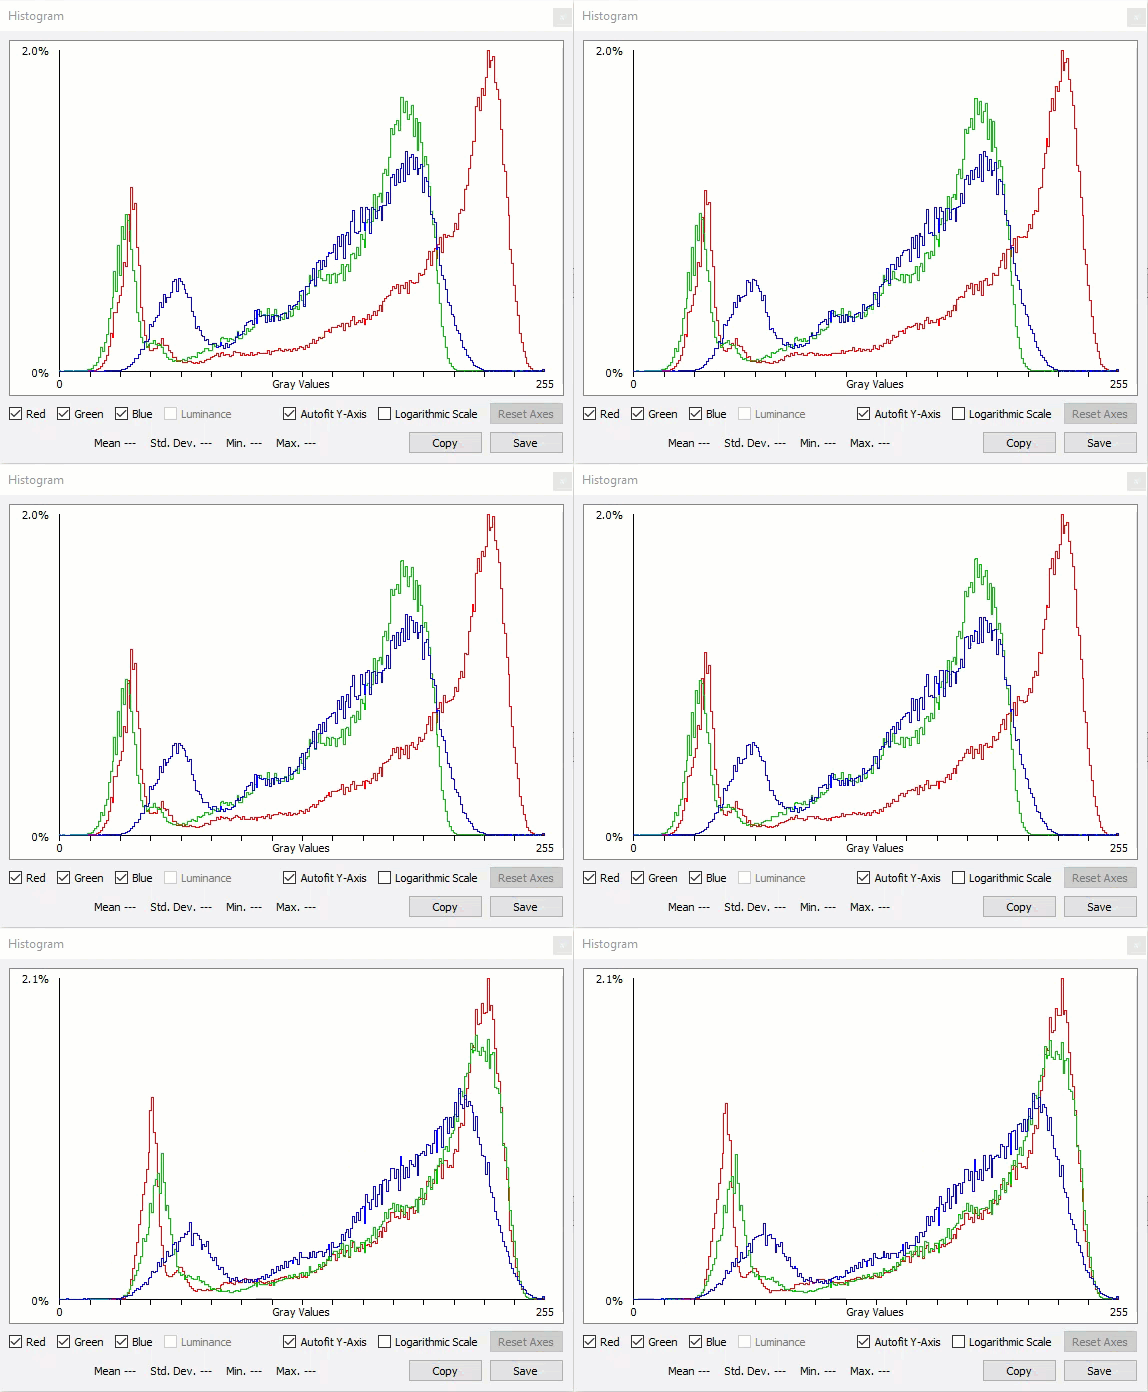
您可以通过设置源和目标值来对齐 RGB 直方图,以便将所有直方图拉伸并移动到相似的起点和终点。
要自动执行此过程,请使用 Tonal Range Auto 功能。
外部链接#
示例代码#
// Enable tonal range adjustments
camera.TonalRangeEnable.SetValue(TonalRangeEnable_On);
// Specify that the summed RGB pixel values are used for tonal range adjustments
camera.TonalRangeSelector.SetValue(TonalRangeSelector_Sum);
// Set the dark source and target values
camera.TonalRangeSourceDark.SetValue(30);
camera.TonalRangeTargetDark.SetValue(0);
// Set the bright source and target values
camera.TonalRangeSourceBright.SetValue(240);
camera.TonalRangeTargetBright.SetValue(255);
INodeMap& nodemap = camera.GetNodeMap();
// Enable tonal range adjustments
CEnumParameter(nodemap, "TonalRangeEnable").SetValue("On");
// Specify that the summed RGB pixel values are used for tonal range adjustments
CEnumParameter(nodemap, "TonalRangeSelector").SetValue("Sum");
// Set the dark source and target values
CIntegerParameter(nodemap, "TonalRangeSourceDark").SetValue(30);
CIntegerParameter(nodemap, "TonalRangeTargetDark").SetValue(0);
// Set the bright source and target values
CIntegerParameter(nodemap, "TonalRangeSourceBright").SetValue(240);
CIntegerParameter(nodemap, "TonalRangeTargetBright").SetValue(255);
// Enable tonal range adjustments
camera.Parameters[PLCamera.TonalRangeEnable].SetValue(PLCamera.TonalRangeEnable.On);
// Specify that the summed RGB pixel values are used for tonal range adjustments
camera.Parameters[PLCamera.TonalRangeSelector].SetValue(PLCamera.TonalRangeSelector.Sum);
// Set the dark source and target values
camera.Parameters[PLCamera.TonalRangeSourceDark].SetValue(30);
camera.Parameters[PLCamera.TonalRangeTargetDark].SetValue(0);
// Set the bright source and target values
camera.Parameters[PLCamera.TonalRangeSourceBright].SetValue(240);
camera.Parameters[PLCamera.TonalRangeTargetBright].SetValue(255);
/* Macro to check for errors */
#define CHECK(errc) if (GENAPI_E_OK != errc) printErrorAndExit(errc)
GENAPIC_RESULT errRes = GENAPI_E_OK;  /* Return value of pylon methods */
/* Enable tonal range adjustments */
errRes = PylonDeviceFeatureFromString(hdev, "TonalRangeEnable", "On");
CHECK(errRes);
/* Specify that the summed RGB pixel values are used for tonal range adjustments */
errRes = PylonDeviceFeatureFromString(hdev, "TonalRangeSelector", "Sum");
CHECK(errRes);
/* Set the dark source and target values */
errRes = PylonDeviceSetIntegerFeature(hdev, "TonalRangeSourceDark", 30);
CHECK(errRes);
errRes = PylonDeviceSetIntegerFeature(hdev, "TonalRangeTargetDark", 0);
CHECK(errRes);
/* Set the bright source and target values */
errRes = PylonDeviceSetIntegerFeature(hdev, "TonalRangeSourceBright", 240);
CHECK(errRes);
errRes = PylonDeviceSetIntegerFeature(hdev, "TonalRangeTargetBright", 255);
CHECK(errRes);
# Enable tonal range adjustments
camera.TonalRangeEnable.Value = "On"
# Specify that the summed RGB pixel values are used for tonal range adjustments
camera.TonalRangeSelector.Value = "Sum"
# Set the dark source and target values
camera.TonalRangeSourceDark.Value = 30
camera.TonalRangeTargetDark.Value = 0
# Set the bright source and target values
camera.TonalRangeSourceBright.Value = 240
camera.TonalRangeTargetBright.Value = 255
您也可以使用 pylon Viewer 轻松设置参数。