相机vTool#
Download the pylon Software Suite to use the Camera vTool.
分配相机#
如果您尚未定义任何特定相机属性,则 Camera vTool 会随机分配一个可用相机。在单相机设计中,这可以让您快速启动并运行。
如果要在多相机设计中将特定相机分配给 Camera vTool,请阅读以下章节。
使用 Camera vTool 对话#
Basler 建议使用 Camera vTool 对话框将相机分配给 Camera vTool。
为此:
- 在 配方管理 窗格(位于 vTool 设置 区域)中,单击 打开设置 或双击 vTool。
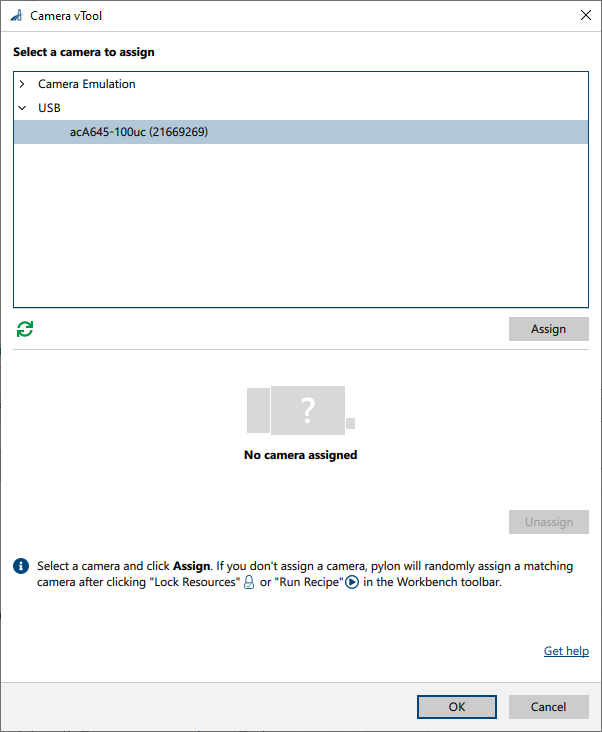
- 选择要分配的相机,然后单击 分配.
相机名称旁边会出现一个绿色复选标记。这表示相机现已分配给 vTool: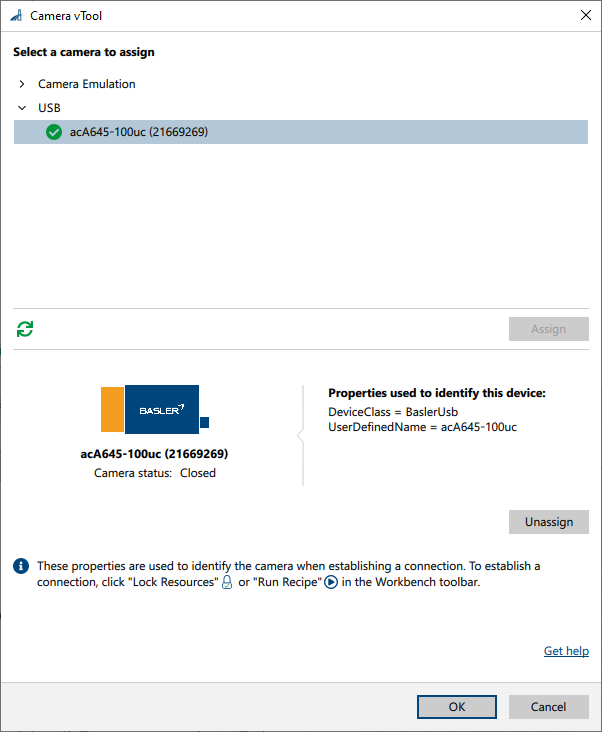
此外,该对话框还显示用于识别设备的属性。在极少数情况下,您可能需要编辑这些属性。要执行此操作,请使用功能窗格。
使用功能窗格#
您也可以使用功能窗格将相机分配给 Camera vTool。
只有在极少数用例中才需要执行此操作,例如,在没有将实体相机连接到计算机的情况下查看或更改相机分配。
要使用功能窗格分配特定相机:
- 在 Workbench 中选择 Camera vTool。
- 打开 Features - All 窗格。
- 如果要列出可用的相机,请单击 vTool > Device Enumeration Control > Device List Update > Execute。
- 使用 Device Selector 参数浏览可用的相机。
这允许您查看有关各个相机的某些信息,以帮助您选择所需的相机。 - 确定所需相机后,单击 Device Choose > Execute 以将该特定相机分配给 Camera vTool。
-
要进一步指定您要分配的相机必须匹配的设备属性,请使用 vTool > Device Enumeration Control 组中的 Device Property * 参数。
信息
有关设备信息属性的更多信息,请参阅 CDeviceInfo 类以及 pylon C++ API 的 Pylon/Key 名称空间的文档。这为您提供了对相机选择的细粒度控制,并确保相同的配方可以在多台计算机上使用适当的相机运行。
Basler 建议,如果将多个相机连接到一个系统,则使用 DeviceClass 和 UserDefinedName 属性。您需要先设置相机的 DeviceUserID 参数,然后才能使用 UserDefinedName 属性选择相机。
请注意,USB 相机需要复位或重启才能使用新设置的设备 DeviceUserID。
配置相机#
将相机分配给 Camera vTool 后,单击 Workbench 工具栏中的锁定资源按钮,以建立与所分配相机设备的专用连接。

现在,您可以在功能 - 全部窗格中配置相机。
在配方中保存相机设置#
保存配方时,相机设置不会自动保存,因为分配给相机 Camera vTool 的相机设备在保存配方时可能未连接,或者相机设备的设置可能已被其他程序更改。
Instead, use the parameters in the Features - All pane under vTool > Configuration Set Persistence to save the settings of a camera device and accompanied settings after you have configured the parameters.
信息
对于初始相机设备配置,Basler 建议使用经典 pylon Viewer 特征。
要在配方中保存相机设置:
- 单击工具栏中的 锁定资源 button in the Workbench toolbar to establish an exclusive connection to the camera device assigned.

- 在 Features - All 窗格中,打开 Configuration Set Persistence 类别并将 Configuration Set Selector 参数设置为 Camera 以选择相机设备的参数集。
- 单击 Configuration Set Fetch 以从相机设备中获取设置并将其存储在 Configuration Set Staged 参数中。
-
Optional: You can inspect or manually modify the parameter settings by copying the text to a text editor and back into Configuration Set Staged.
In the text editor, you will see that each line of text contains the name and the value of a parameter separated by a tab or = character. Lines starting with # are treated as comments. A configuration set must start with the following line:
# {05D8C294-F295-4dfb-9D01-096BD04049F4}信息
或者,您可以使用用户集永久存储相机设置。
-
单击 Configuration Set Commit 以应用参数并将参数存储在配方设置中。这样可以确保每次执行锁定资源操作时都会自动设置参数。
信息
如果已经分配了相机,则参数设置会立即传输到相机。如果传输失败,参数设置将不会存储在 Configuration Set Active 中。如果没有分配相机,则设置将在分配时传输到相机。如果此传输失败,则无法启动配方。
某些相机参数,如 Camera Instance 配置集中的参数,只能在相机关闭时更改。在这种情况下,存储在 Configuration Set Active 中的参数在打开相机之前分配时会传输到相机。
-
要从配方中清除参数设置,请单击 Clear Data。
Using Event Notifications and Chunk Data#
The Camera vTool also allows you to access event and chunk data of the camera. You can add additional output pins for events and chunk data to use these to control your application. Camera events, e.g., exposure end, can be used to control external devices. Chunk data, e.g., timestamp or exposure time, can be used to control and synchronize tasks in an application.
信息
- Pins can only be added when the recipe isn't running.
- Pin names must be unique.
- Allowed data types: Boolean, Float, Integer, and String
Accessing Camera Events#
- Enable the desired event on the camera.
- 在 Workbench 中选择 Camera vTool。
- 打开 Features - All 窗格。
- Go to the vTool > Event Output Control group.
- Execute the Event Pin Add command.
- In the Event Pin Configuration field, enter the configuration of the event pin you want to add. Use the following syntax:
<MyPinName>.Type=<MyPinType>.EventName=<CameraEvent>.ValueName=<CameraEventValue>
where:<MyPinName>: Name of the new output pin<MyPinType>: Data type of the event you want to access (allowed values: Boolean, Float, Integer, and String)<CameraEvent>: Name of the event you want to access as in the camera<CameraEventValue>: Name of the event value as in the camera, e.g.,EventExposureEnd - Press Enter.
The new pin appears in the vTool.
Configuration Example#
Assume you want to create an output pin with the name ExposureEnd and the data type Integer that outputs the information from the exposure end camera event. To do this, enter the following string:
ExposureEnd.Type=Integer.EventName=ExposureEnd.ValueName=EventExposureEnd
Accessing Chunk Data#
- Enable the chunk mode and the desired data chunk on the camera.
- 在 Workbench 中选择 Camera vTool。
- 打开 Features - All 窗格。
- Go to the vTool > Chunk Data Output Control group.
- Execute the Chunk Pin Add command.
- In the Chunk Pin Configuration field, enter the configuration of the data chunk pin you want to add. Use the following syntax:
<MyPinName>.Type=<MyPinType>.ValueName=<ChunkName>
where:<MyPinName>: Name of the new output pin<MyPinType>: Value type of the chunk data you want to access as in the camera<ChunkName>: Name of the chunk you want to access as in the camera, e.g., ChunkExposureTime - Press Enter.
The new pin appears in the vTool.
Configuration Example#
Assume you want to create an output pin with the name ExposureTimeChunk and the data type Integer that outputs the information from the exposure time chunk of the camera. To do this, enter the following string:
ExposureTimeChunk.Type=Float.ValueName=ChunkExposureTime
故障排除#
找到多个匹配相机
问题:打开 Camera vTool 对话框时,相机名称旁边会出现警告标志:
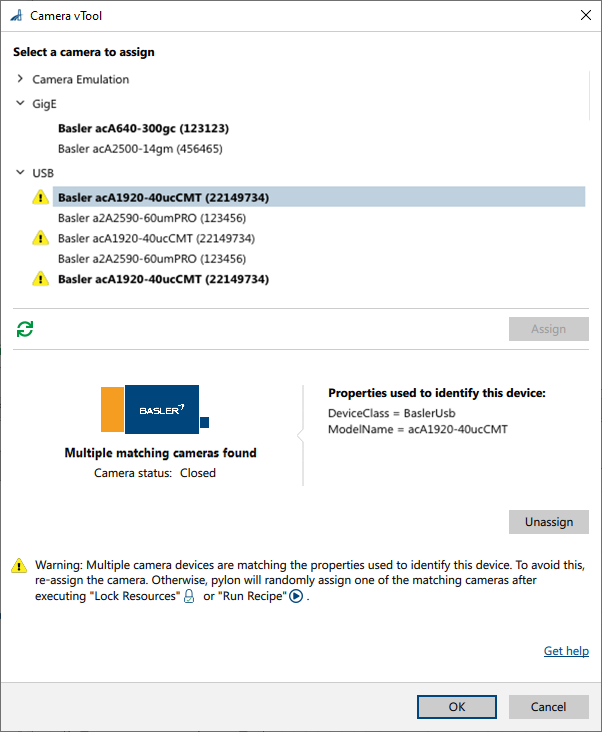
原因:这是因为有多个相机与 vTool 中存储的设备属性匹配。
在上述示例中,存储的设备属性为 DeviceClass = BaslerUsb 和 ModelName = acA1920-40uCMT。有三台相机与这些属性匹配,因为它们都是名为“acA1920-40uCMT”的 USB 相机。
未找到匹配相机
问题:打开 Camera vTool 对话框时,会显示“未找到匹配相机”的消息。
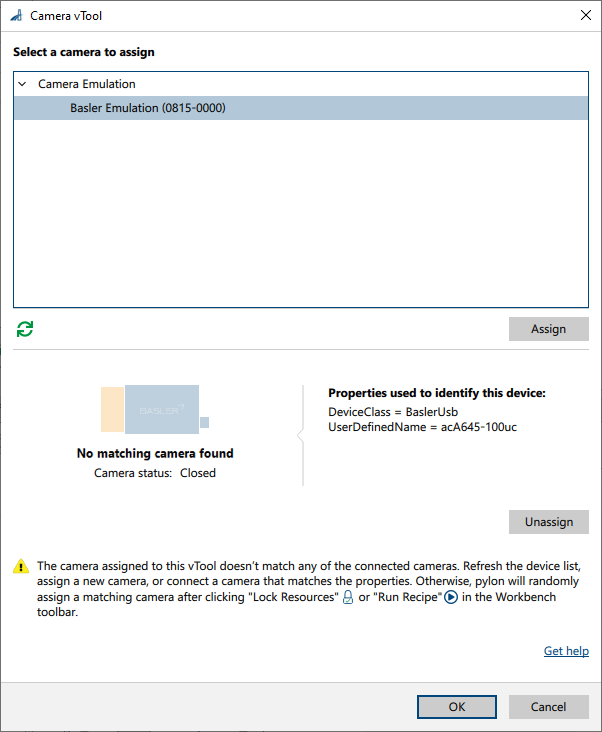
原因:这是因为没有相机与存储在 vTool 中的设备属性匹配。
在上述示例中,存储的设备属性为 DeviceClass = BaslerUsb 和 ModelName = acA645-100uc。但是,未连接名为“acA645-100uc”的相机。
输出#
图像#
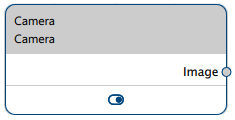
返回相机拍摄的图像。任何接受图像作为输入的 vTool 都可以使用此输出图像。
- 数据类型:图像
- 图像格式:根据相机配置