Flat-Field Correction (pylon Viewer)#
The pylon Viewer supports two types of flat-field correction (FFC):
- Block-based flat-field correction: Available on ace 2 PRO cameras with GigE and USB 3.0 interfaces, ace 2 Basic cameras with 5GigE interface, and ace 2 cameras with CoaXPress interface
- Column-based flat-field correction: Available on boost V cameras
Both types offer a wizard that guides you through the process of calibrating your camera.
Depending on the type of flat-field correction, different steps are performed. See the respective section in this topic for more details.
运作原理#
Non-uniformities in images are caused by dark currents, illumination and lens characteristics, and differing light sensitivities of sensor pixels. This is a common effect in digital imaging. Flat-field correction minimizes these image artifacts by correcting the original pixel values.
Flat-field correction works by capturing a series of images, evaluating them, and generating correction data from the result. This correction data can be uploaded to the camera to reduce non-uniformities during image acquisition.
As well as uploading the correction data, you also have to enable the desired flat-field correction mode. For instructions, see the Flat-Field Correction topic.
Block-Based Flat-Field Correction#
This feature complements the Block-Based Flat-Field Correction camera feature available on ace 2 PRO cameras with GigE and USB 3.0 interfaces and ace 2 cameras with CoaXPress interface.
Flat-field correction coefficients are calculated and applied to reduce the impact of inhomogeneities caused by illumination and camera lenses. For this, a series of images taken with homogeneous illumination is evaluated to generate correction values.
Apart from the calculation of correction coefficients, this type of flat-field correction includes black level compensation. Black level compensation reduces the impact of variations in pixel output when a sensor isn't exposed to light. This step is optional. Under normal circumstances, Basler cameras don't require this sort of correction. A reasonable approach would be to skip it and only perform this step if the resulting images are too dark.
信息
To generate good correction data, some camera parameters are changed automatically by the wizard. After closing the wizard, the original settings are restored. The following parameters are affected:
Width: Will be set to maximum valueHeight: Will be set to maximum valuePixelFormat: Will be set toMono8ExposureAuto: Will be set toOffBslFlatFieldCorrectionSelectora: Will be set toBlockBasedBslFlatFieldCorrectionModea: Will be set toOffBslFlatFieldCorrectionSetIndexaBinningHorizontal: Will be set to 1BinningVertical: Will be set to 1BslScalingFactor: Will be set to 1.0BslColorSpace: Will be set toOffLUTEnable: Will be set to 0BslBrightness: Will be set to 0.0BslContrast: Will be set to 0.0ColorTransformationEnable: Will be set to 0BslColorAdjustmentEnable: Will be set to 0ExposureTimeSelector: Will be set toCommonTestPattern: Will be set toOffReverseX: Will be set to 0ReverseY: Will be set to 0
-
If you select the Apply correction data check box in step 4, these parameter values remain as they are. They are not reset to the original values.
准备工作#
You need the following items before you start the calibration:
- An appropriate object to completely cover the lens, e.g., the lens cap
This is optional as it's only required for black level compensation. - A target with a uniform background
For example, you could point the camera at a white piece of cardboard or place it in a light box.
信息
- Acquire the images in your actual application environment.
- Calibration must be repeated if you change any part of the imaging system, including the camera, lighting, or lens.
To open the wizard:
- 打开相机。
- Right-click the camera and select Flat-Field Correction in the shortcut menu or select Flat-Field Correction in the Camera menu.
Each step of the wizard features a Camera Image pane where a live image of the camera is shown.
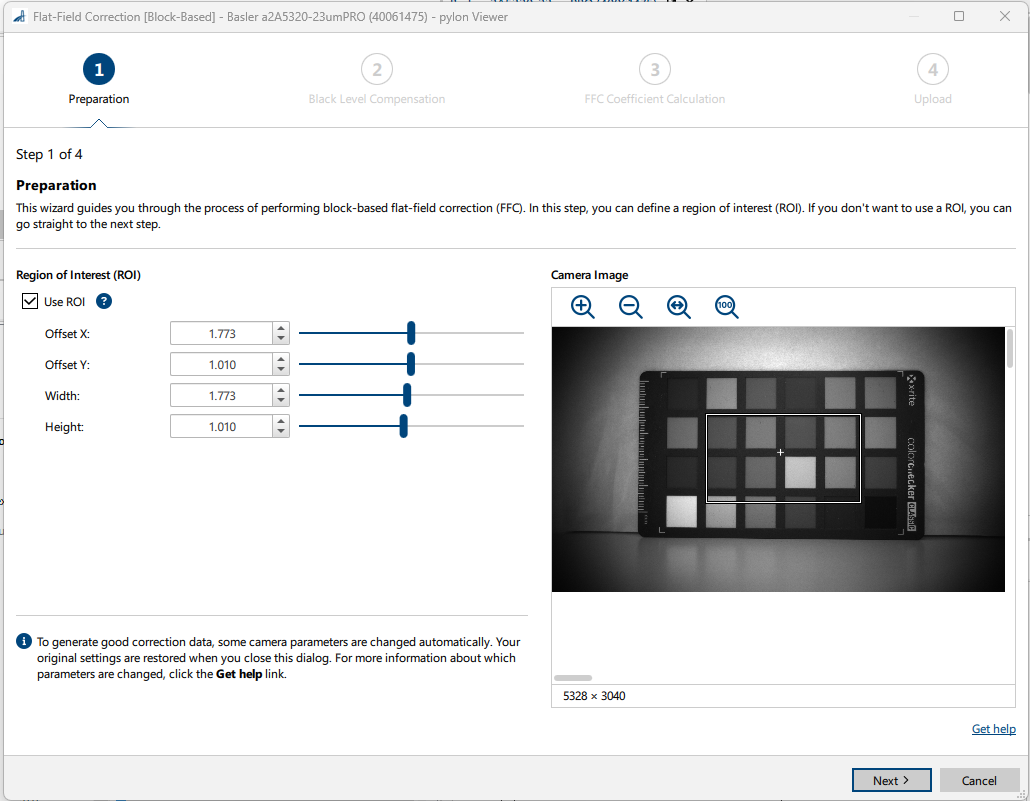
步骤 1:准备#
Here, you can specify whether the correction data should be based on the entire image or just a certain area of it. For example, you may want to exclude the edges of an image because they are significantly darker or brighter than the rest of the image. For this purpose, you can define a region of interest (ROI). The ROI is visualized in the camera image as a rectangle.

To use an ROI:
- Select the Use ROI check box.
- Specify width, height, and offsets of the ROI.
- 单击下一步。
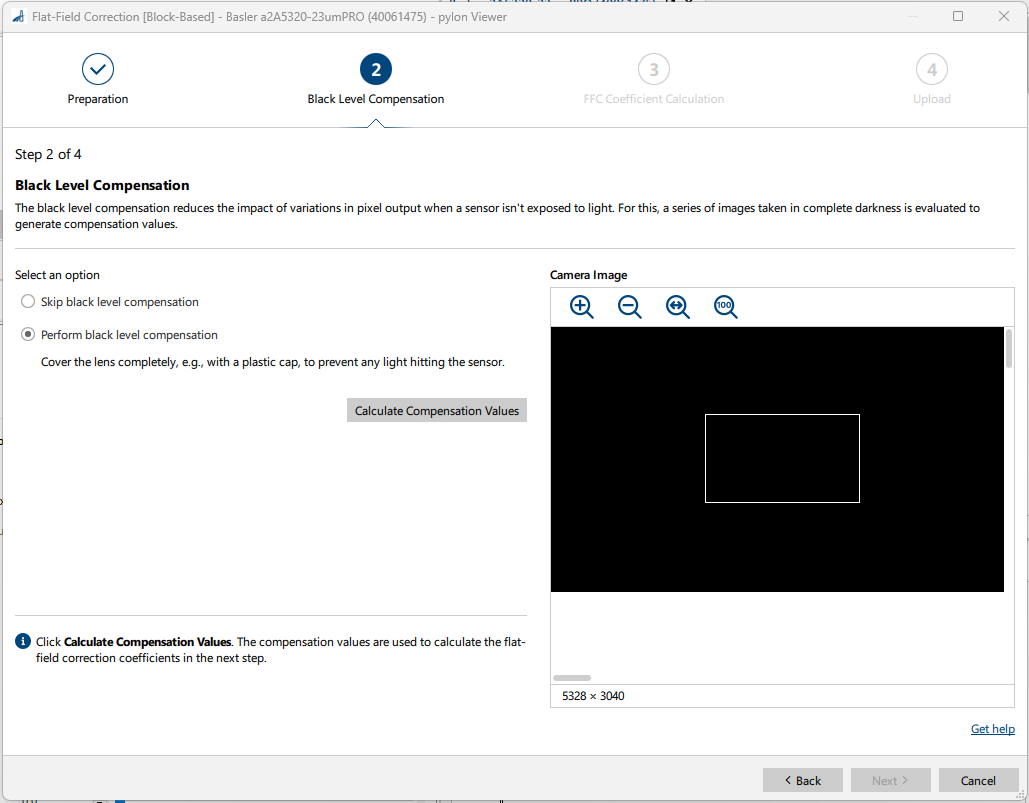
Step 2: Black Level Compensation (Optional)#

To perform black level compensation:
- Cover the lens completely.
- Click Calculate Compensation Values.
A series of dark images is taken and evaluated. The resulting correction data are used in the next step to improve the FFC coefficients. - 单击下一步。
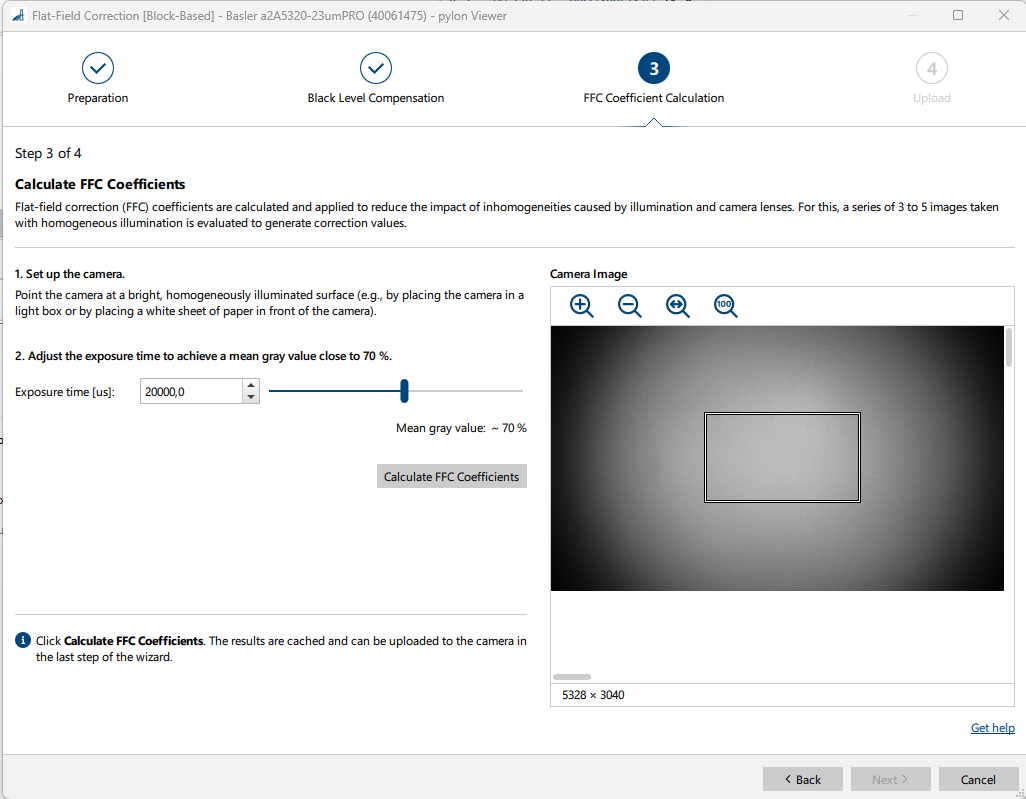
Step 3: Calculate FFC Coefficients#

To calculate flat-field correction coefficients:
- Ensure that the camera is pointing at a uniformly illuminated target.
For details, see Before You Start. - Adjust the exposure time to achieve a mean gray value close to 70 % (RGB 200, 200, 200).
You can see the effect of the changes in the live camera image. - Click Calculate FFC Coefficients.
A series of images is taken and evaluated. The resulting correction data are generated and cached. They can be uploaded to the camera in step 4.
The results, maximum and mean FFC coefficients, are displayed. - If the image is too dark, keep adjusting the exposure time and recalculating the coefficients until you're satisfied.
- 单击下一步。
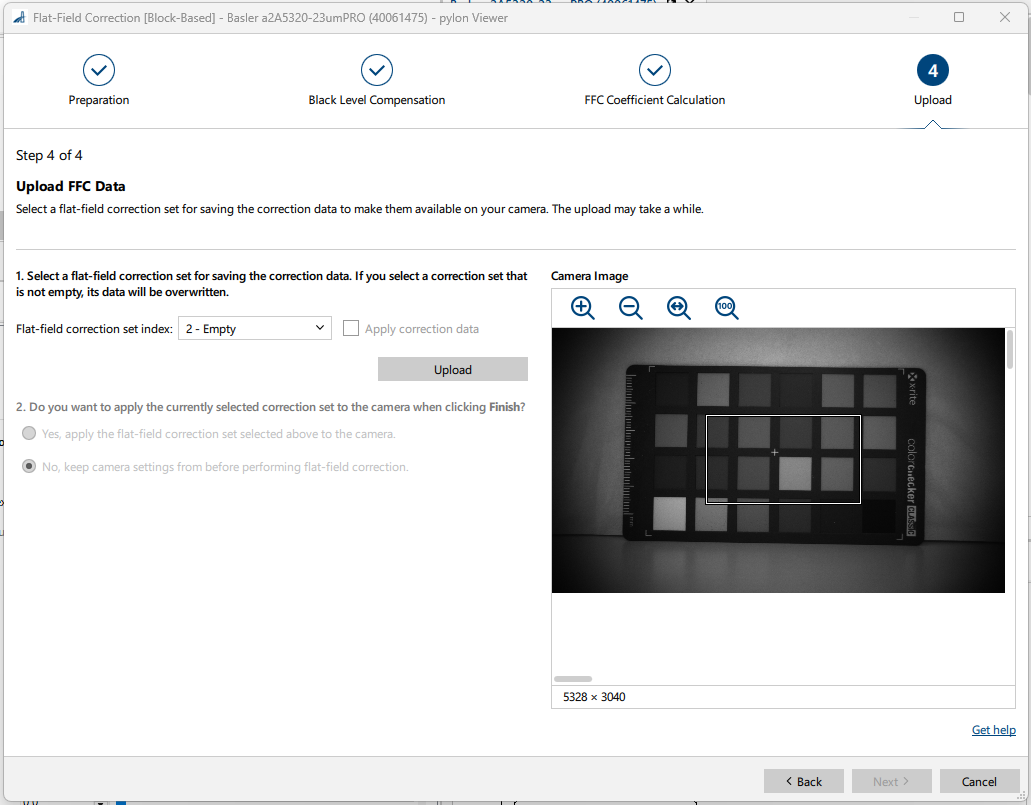
Step 4: Upload FFC Data#
This step allows you to upload the correction data to the camera, check the correction results in the live camera image, and turn the flat-field correction camera feature on.
You can also switch between correction sets saved earlier and check the effects in the live camera image.

To upload correction data:
- In the Flat-field correction set index drop-down box, select the desired correction set index.
If you select a correction set that is not empty, its contents will be overwritten. - Click Upload.
The correction data are uploaded to the camera and saved in a correction set. They will still be available in the correction set after a camera reboot. - Select the Apply correction data check box to see the effects of the correction data in the Camera Image pane.
If you keep this check box selected and switch correction sets, the live camera image changes accordingly. -
Decide whether the correction data should remain active after closing the wizard.
- Click Yes, apply… to enable the correction mode with the current correction set.
- Click No, keep… to restore the original camera settings.
The uploaded data will remain in the selected correction set.
-
Click Finish to close the wizard.
Column-Based Flat-Field Correction#
This feature complements the Column-Based Flat-Field Correction camera feature available on boost V cameras.
To calibrate the camera, a series of dark field and bright field images is captured and evaluated to generate the correction data for reducing dark signal non-uniformities (DSNU) and photo response non-uniformities (PRNU) from the images you acquire.
After the correction data have been generated, you have to upload them to the camera's flash memory. To use the correction data during image acquisition, you have to enable the desired flat-field correction mode. To do this, follow the instructions in the Flat-Field Correction topic.
准备工作#
You need the following items before you start the calibration:
- An appropriate object to completely cover the lens, e.g., the lens cap
- A target with a uniform background, e.g., a piece of white cardboard
信息
- Acquire the dark and bright field images in your actual application environment.
- Calibration must be repeated if you change any part of the imaging system, including the camera unit, lighting, or lens.
To open the wizard:
- Open the camera in the Devices pane.
- Right-click the camera and select Flat-Field Correction in the shortcut menu.
Step 1: Dark Signal Non-Uniformity (DSNU) Correction#
- Cover the lens completely.
- Click Generate Correction Data.
A series of dark images is taken and evaluated. The resulting correction data are generated and cached. - 单击下一步。
信息
To generate good correction data, the Width and Height parameters will be set to their maximum values and the pixel format will be set to Mono 8. When you close the wizard, the original settings will be restored.
Step 2: Photo Response Non-Uniformity (PRNU) Correction#
- Ensure that the camera is pointing at a uniformly illuminated target.
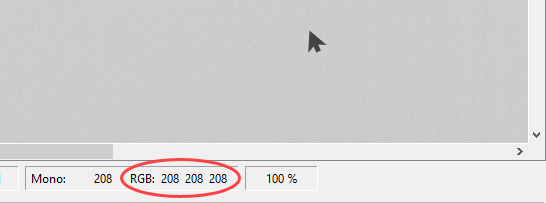
For details, see Before You Start. - In the feature tree, adjust the exposure time to achieve a gray value level close to 70 % (RGB 200, 200, 200).
- Acquire an image.
-
Check the RGB values in the status bar by pointing the mouse at individual pixels in the image display area.
Alternatively, you can open the histogram to determine the mean gray value.
-
If you're not happy with the gray value level, keep adjusting the exposure time, acquiring images, and checking the gray value level until you're satisfied.
- Click Generate Correction Data.
A series of bright images is taken and evaluated. The resulting correction data are generated and cached.
Step 3: Upload Correction Data#
- Click Upload to upload the DSNU and PRNU correction data to the camera.
- After the correction data have been uploaded successfully, click Finish to close the wizard.
The correction data have been uploaded to the camera's flash memory.
后续步骤#
When you're ready to perform flat-field correction, follow the instructions in the Flat-Field Correction topic to enable the desired correction mode.