C++ 程序员指南#
如果您是 pylon 的新手,Basler 建议您先阅读 pylon C++ Programmer's Guide 的 Getting Started 部分,以熟悉 pylon C++ API。
信息
本主题中的所有信息均适用于所有 blaze 和 Smart blaze 相机型号。为简便起见,下文统一使用“blaze”指代所有型号。
C++ 编程示例#
To open the folder containing the programming samples for blaze cameras, press the Win key, go to the Basler folder, and choose blaze Samples. A File Explorer window opens. The C++ programming samples are located in the cpp folder.
The C++ samples are located in the /opt/pylon/share/pylon/Samples/blaze/cpp folder.
构建示例的先决条件#
- Visual Studio 2017 or above
- Optional: OpenCV library
- Optional: Point Cloud Library (PCL)
- Optional: Boost libraries
- CMake 3.3 or above
- Optional: Aravis
On an Ubuntu system, you can install the prerequisites by issuing the following command:
Info
There is no Debian package available for the Aravis library. Aravis must be built from sources instead.
如何构建示例#
信息
在构建示例之前,请将包含示例的文件夹复制到您具有读写权限的任意位置。
CMake 用于构建 C++ 示例。槽
Windows#
- Start Visual Studio.
- On the start page, choose the Open Folder or Open a local folder option, and navigate to the folder you copied the samples to.
- Open the cpp subfolder and click the Select Folder button.
Visual Studio runs CMake in the background. It will take a moment until you can build the samples by selecting Build All in the Build menu.
When you don't want to use Visual Studio's CMake integration, you can use the cmake-gui tool to generate Visual Studio solution and project files that you can open with Visual Studio.
If there is no CMake >= 3.3 installed, download a CMake Windows installer from the CMake website. Launch the .msi installer and follow the instructions.
To generate Visual Studio project and solution files for the blaze samples:
- Start cmake-gui.
- Click the Browse Source… button, and navigate to the folder you copied the samples to.
- Open the cpp folder by clicking the Select folder button.
- Specify a folder where the binaries will be built by clicking the Browse Build… button and choosing or creating a folder of your choice.
Basler advises against choosing the root folder of the source tree, i.e., the folder this document is located in. Common practice is to create a subfolder (e.g., namedbuild). - Click the Configure button.
A dialog opens. - Choose the desired Visual Studio version and platform.
Make sure that the selected platform (x86 or x64) matches the architecture that the OpenCV and PCL libraries are built for. - Click the Finish button to close the dialog.
The configuration procedure starts. - Once the configuration procedure has succeeded, click the Generate button to create the Visual Studio project and solution files.
The files will be generated in the build folder that you specified earlier. - Navigate to that build folder and open the .sln file.
Now, you can build the samples by selecting Build All in the Build menu.
如果在构建和运行示例时遇到问题,请参考故障排除主题。
Linux#
要构建示例,请打开命令行终端,导航到复制示例的文件夹。然后,进入 cpp 子文件夹并执行以下命令:
如果 CMake 未能找到 pylon SDK,请检查是否已正确安装 pylon SDK 以及 pylon Supplementary Package for blaze。
如果您将软件安装在 /opt/pylon 以外的路径,请确保已将 PYLON_ROOT 环境变量设置为安装 pylon 及补充包的文件夹。
示例:
如果 CMake 未能找到 OpenCV 库或 PCL,请确保已安装 OpenCV 库和 PCL 的开发包。
如果在构建和运行示例时遇到问题,请参考故障排除主题。
安装 OpenCV 库#
Windows#
您可以从 GitHub 下载 OpenCV。
请确保下载与您将要使用的 Visual Studio 版本兼容的 OpenCV 库版本。如果没有合适的预编译版本,您必须使用计划用于构建应用程序的 Visual Studio 版本从源代码构建 OpenCV。
如果 CMake 未能找到 OpenCV,请将 OpenCV_DIR 变量设置为包含 OpenCVConfig.cmake 文件的文件夹。
示例
- Open the CMakeSettings.json file (CMake -> Change CMake Settings -> blazeCppSamples).
- Add the following to the cmakeCommandArgs list:
-DOpenCV_DIR=\"C:\\Program Files\\OpenCV\\build\\x64\\vc16\\lib\"
- Open the CMake Settings dialog (Project -> CMakeSettings for blazeCppSamples).
- Enter the following in the CMake command arguments field:
-DOpenCV_DIR="C:\Program Files\OpenCV\build\x64\vc16\lib" - Press Ctrl S to save the changes.
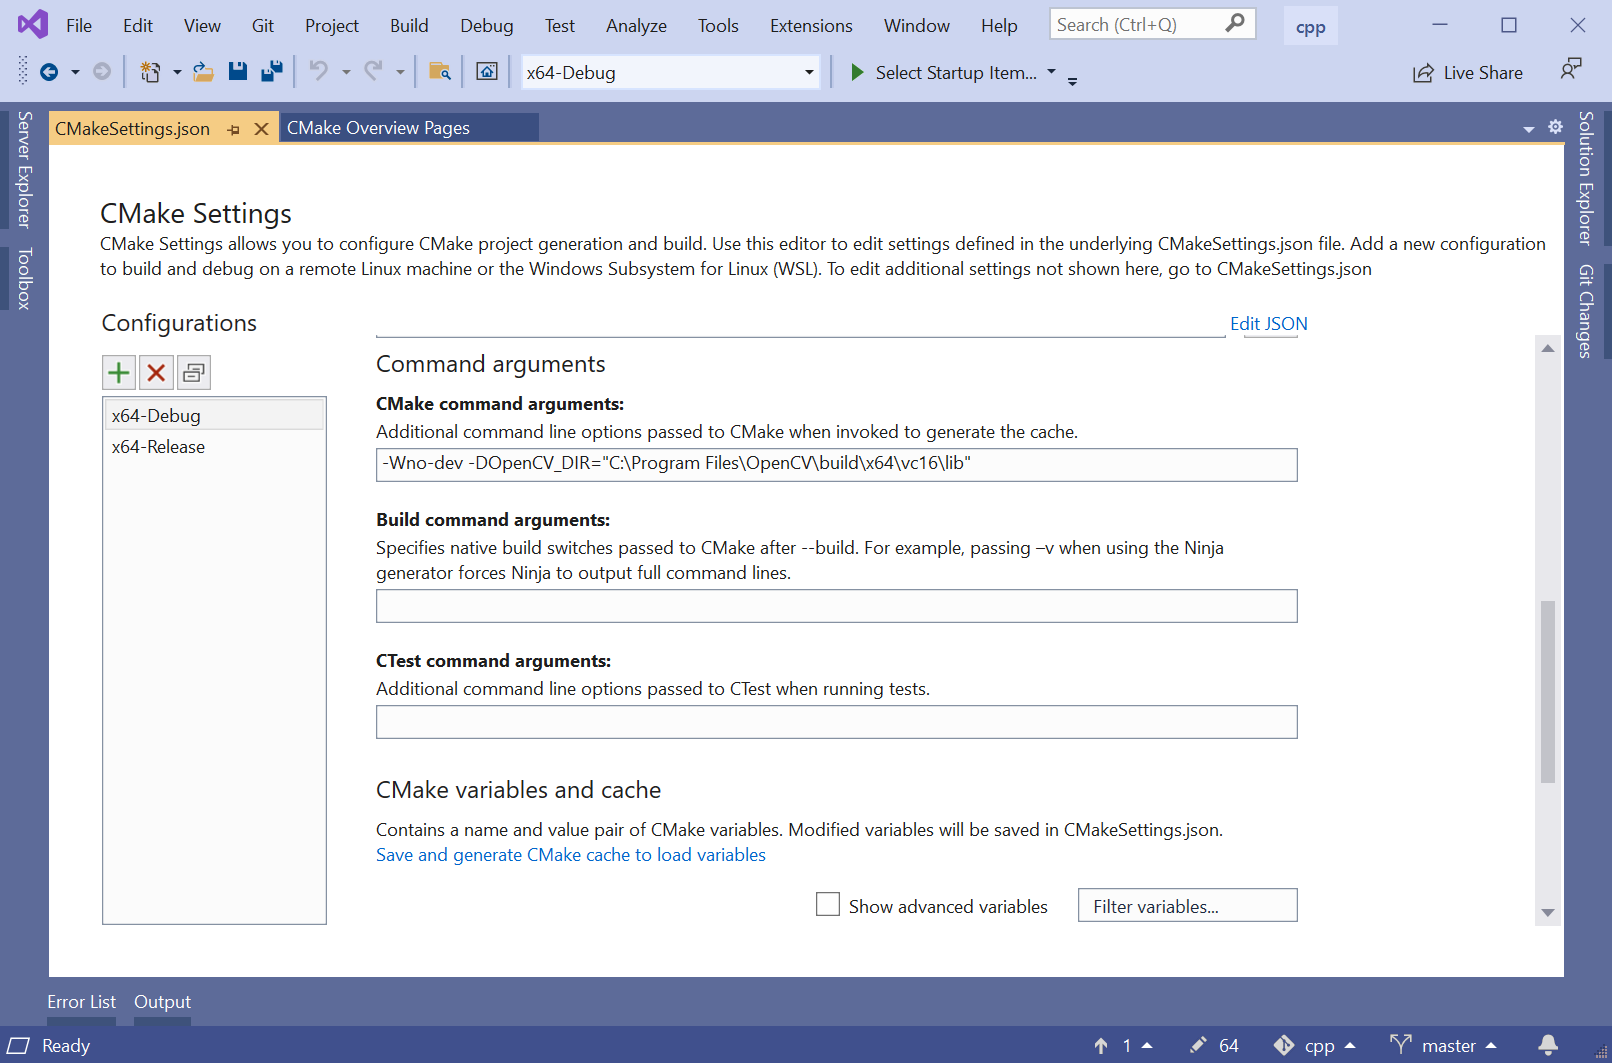
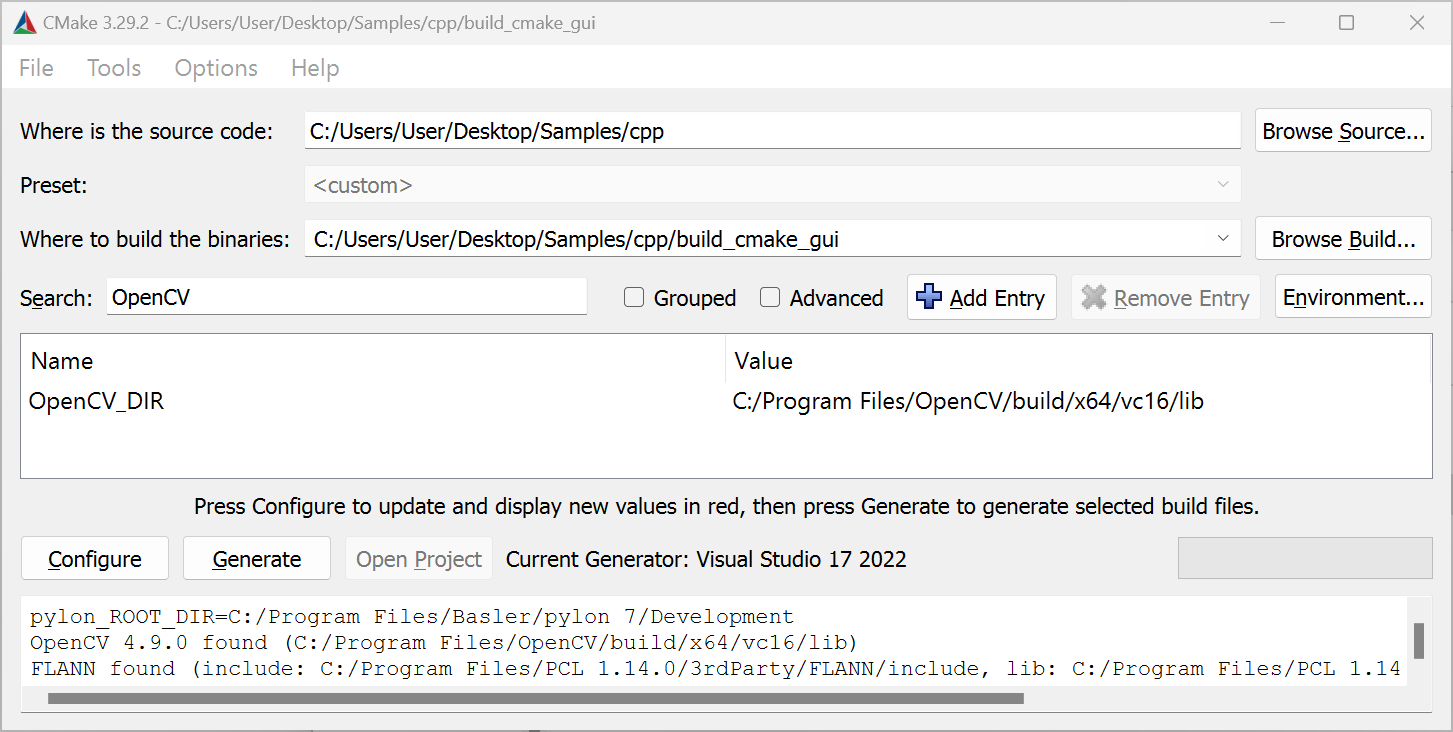
Before you can access the OpenCV_DIR in the CMake GUI, make sure that the Grouped check box is deselected in the CMake GUI.
将 OpenCV 添加到 PATH 环境变量#
您必须将 OpenCV bin 目录添加到 PATH 环境变量中。
- 按 Win 键。
- 键入“environment”。
- 点击编辑您账户的环境变量。
- 点击环境变量…按钮。
- 在用户变量区域中,选择 Path。
- 点击编辑按钮。
- 点击新建。
- 输入您的 OpenCV 安装路径,例如 C:\Program Files\OpenCV\build\x64\vc16\bin。
- 单击确定。
Linux#
如果 CMake 未能找到 OpenCV 库,您必须安装 libopencv 开发包或从源代码构建 OpenCV 库。
在 Ubuntu 系统上,可以通过执行以下命令来安装 libopencv 开发包:
当您从源代码构建 OpenCV 库并将其安装到非标准位置时,可以使用 OpenCV_DIR CMake 变量来指定 OpenCVConfig.cmake 文件所在的位置。
示例:
安装 Point Cloud Library#
Windows#
您可以从 GitHub 下载适用于 Windows 的 PCL All-in-one Installer。
请确保下载与您将要使用的 Visual Studio 版本兼容的 PCL 版本。
如果 CMake 未能找到 PCL,请将 PCL_DIR 变量设置为包含 PCLConfig.cmake 文件。
示例
- Open the CMakeSettings.json file (CMake -> Change CMake Settings -> blazeCppSamples)
- Add the following to the
cmakeCommandArgslist:-DPCL_DIR=\"C:\\Program Files\\PCL 1.9.1\\cmake\"
- Open the CMake Settings dialog (Project -> CMakeSettings for blazeCppSamples).
- Enter the following in the CMake command arguments field:
-DPCL_DIR="C:\Program Files\PCL 1.12.1\cmake" - Press Ctrl S to save the changes.
- Open the CMake Settings dialog (Project -> CMakeSettings for blazeCppSamples).
- Enter the following in the CMake command arguments field:
-DPCL_DIR="C:\Program Files\PCL 1.14.0\cmake" - Press Ctrl S to save the changes.
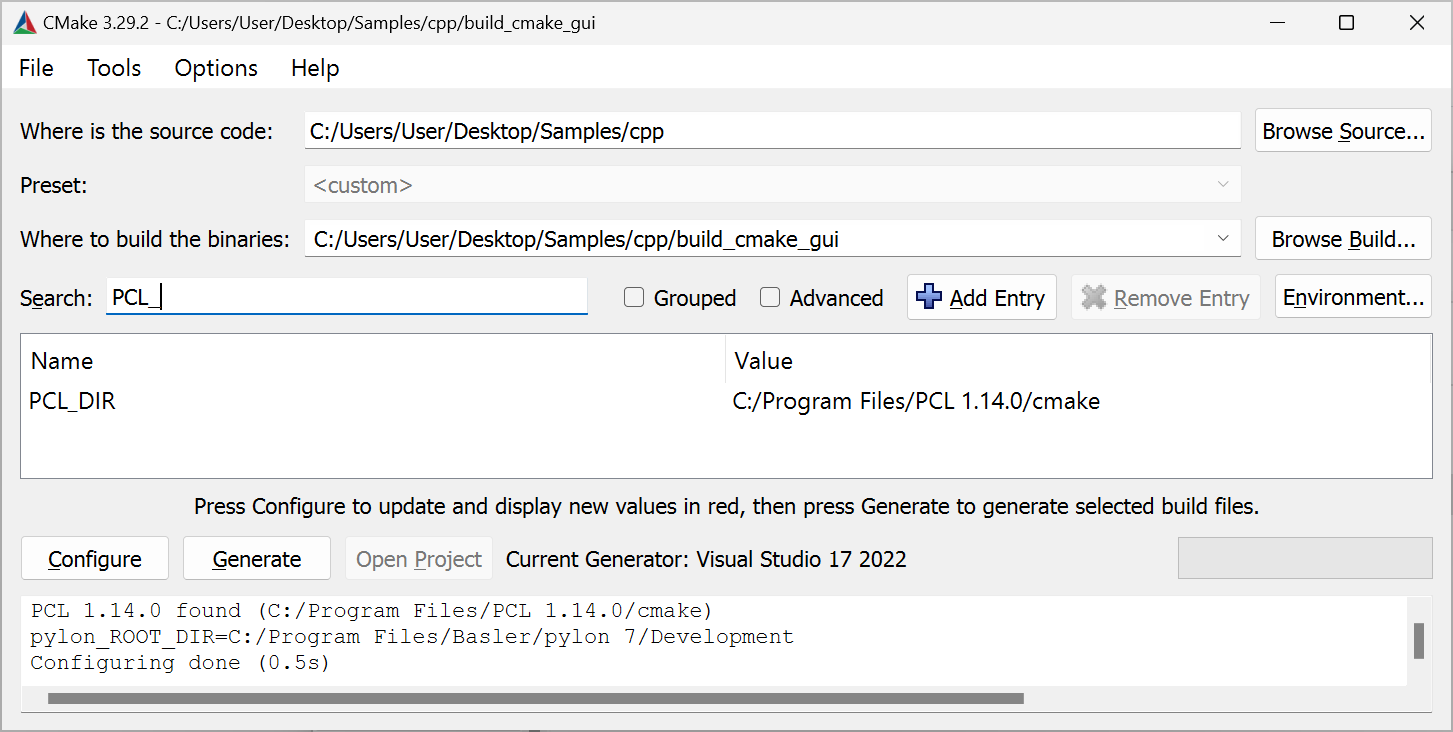
Before you can access the PCL_DIR in the CMake GUI, make sure that the Grouped check box is deselected in the CMake GUI.
使用 PCL All-in-one Installer 安装 PCL 时,安装程序会自动添加 PCL bin 目录添加到 PATH 环境变量。如果您使用其他安装方法,则必须自行添加 bin 目录添加到 PATH 环境变量。
PCL All-in-one Installer 会将 OpenNI2.dll 安装到 %ProgramFiles%\OpenNI2\Redist 文件夹中。运行时需要此 DLL。请将此文件夹添加到您的 PATH 环境变量中,或者将 OpenNI2.dll 指向 PCL 二进制文件所在的文件夹,例如: %ProgamFiles%\PCL 1.13.0\bin.
Linux#
如果 CMake 未能找到 PCL 库,您必须安装 libpcl 开发包,或者从源代码构建 PCL 库。
在 Ubuntu 系统上,可以通过执行以下命令来安装 libpcl 开发包:
如果您从源代码构建 PCL 并将其安装到非标准位置,则 PCL_DIR CMake 变量来指定 PCLConfig.cmake 文件位于该位置。
示例:
注意
根据系统上安装的 PCL 和 VTK 库版本,使用点云库 (PCL) 的示例可能会崩溃。此崩溃是由 PCL 用于 3D 可视化的 VTK 库中的一个漏洞引起的。
来源:https://github.com/PointCloudLibrary/pcl/issues/5237
解决方案:PCL 1.13.1 包含用于绕过 VTK 漏洞的修复程序。
请更新到 PCL 1.13.1 或更高版本。如有必要,请卸载 Linux 发行版提供的 PCL 库,并从源代码构建 PCL 1.13.1 或更高版本(可以从 GitHub 获取)。
安装 Boost Libraries#
Windows#
如果您是从源代码构建的点云库 (PCL),或者如上所述使用 All-in-one installer 安装了该库,则用于构建 PCL 的 Boost 库也将自动用于构建 blaze 示例。
如果没有可用的 PCL 库,但您想要构建需要 Boost 库的 blaze 示例,则必须从源代码构建 Boost 库或将其安装(例如,通过使用可以从 sourceforge.net 下载的预构建二进制文件)。请下载适合您正在使用的 Visual Studio 版本以及您正在为其构建应用程序的架构的安装程序。
如果 CMake 未能检测到已安装的 Boost 库,您必须设置 Boost_DIR CMake 变量。该变量必须指向包含 BoostConfig.cmake 文件。
示例
- Open the CMakeSettings.json file (CMake -> Change CMake Settings -> blazeCppSamples).
- Add the following to the
cmakeCommandArgslist:-DBoost_DIR=\"C:\\local\\boost_1_84_0\\lib64-msvc-14.1\\cmake\\Boost-1.84.0\"
- Open the CMake Settings dialog (Project -> CMakeSettings for blazeCppSamples).
- Enter the following in the CMake command arguments field:
-DBoost_DIR="C:\local\boost_1_84_0\lib64-msvc-14.2\cmake\Boost-1.84.0" - Press Ctrl S to save the changes.
- Open the CMake Settings dialog (Project -> CMakeSettings for blazeCppSamples).
- Enter the following in the CMake command arguments field:
-DBoost_DIR="C:\local\boost_1_84_0\lib64-msvc-14.3\cmake\Boost-1.84.0" - Press Ctrl S to save the changes.
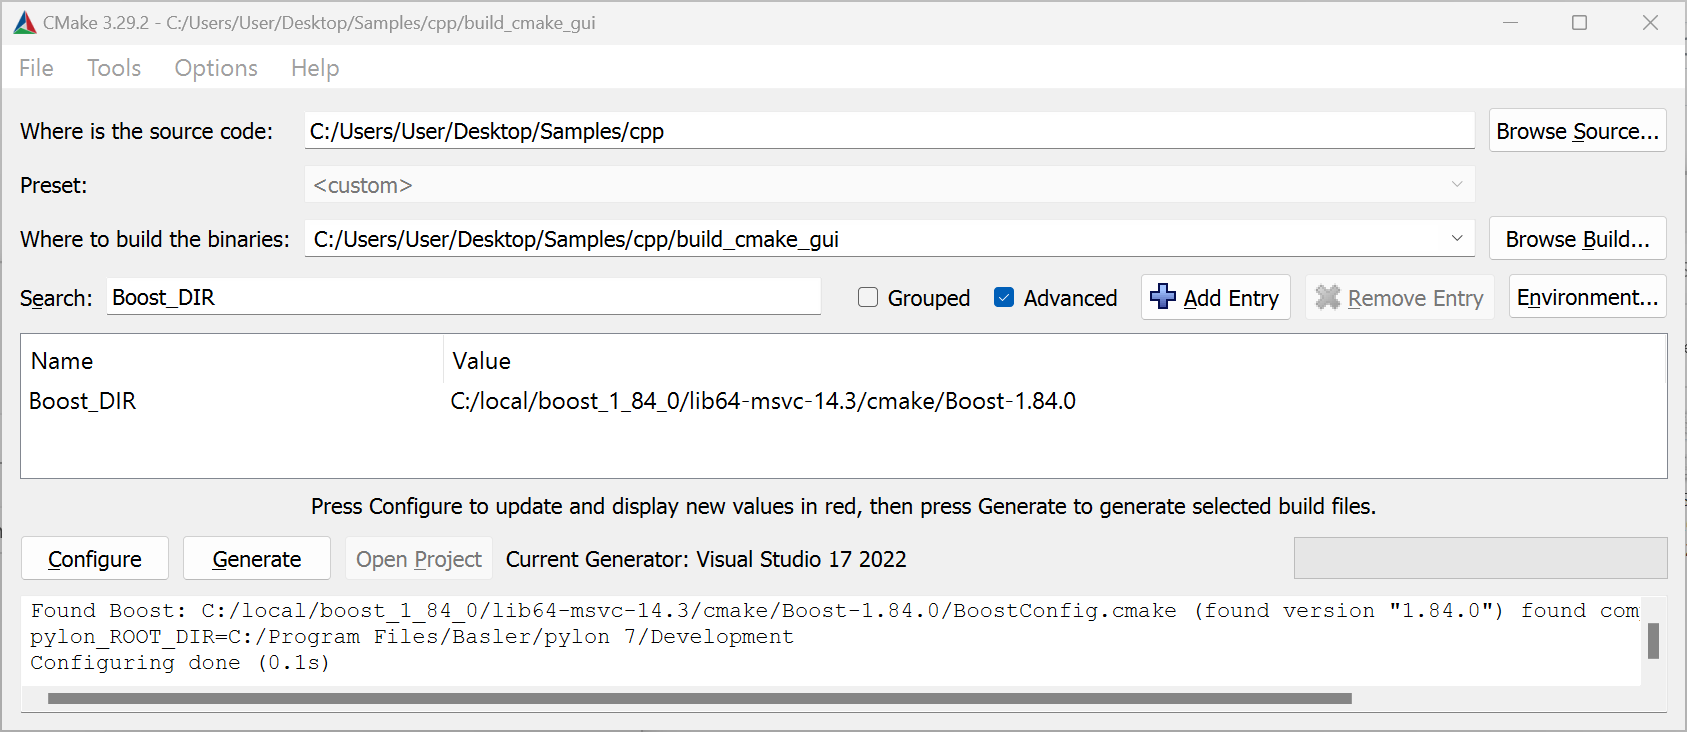
Before you can access the Boost_DIR in the CMake GUI, make sure that the Advanced check box is selected and the Grouped check box is deselected in the CMake GUI.
Linux#
如果 CMake 未能找到 Boost 库,您必须安装 libboost 开发包,或者从源代码构建 Boost 库。
在 Ubuntu 系统上,可以通过执行以下命令来安装 libboost 开发包:
示例列表#
- FirstSample: 本节介绍 blaze 相机的操作方法,重点讲解如何获取 3D 点云数据。请参考 pylon C++ 示例套件中的以下示例,了解使用 pylon 实现采集循环的不同方法:
- Grab_Strategies
- Grab_UsingBufferFactory
- Grab_UsingGrabLoopThread
- ParametrizeCamera:演示如何访问相机参数。
- DeviceRemovalHandling:演示如何检测和处理设备的拔出。
- GrabDepthMap:演示如何采集和解释以灰度图像表示的 3D 信息的深度图。
- ConvertPointCloud2DepthMap:如果要同时处理 3D 点云和深度图,请参考此示例,它演示了如何从 3D 点云中提取深度图。该示例还演示了如何将彩虹色映射应用于深度图。
- ShowPointCloud_PCL:演示如何使用点云库 (PCL) 可视化用 Basler blaze 相机采集的点云。
- ConvertAndFilter_PCL:类似于 ShowPointCloud。演示如何将 PCL 滤波器应用于 3D 点云。
- SavePointCloud:演示 GrabSingleImage 便捷方法以及如何将点云保存到 .pcd 文本文件中。
- SaveAndLoadPointCloudUsingPCL:演示如何使用 PCL 更高效地将点云保存到文件。该示例还展示了如何从文件加载点云。
- FeatureDumper:列出所有相机参数及其 Property。作为如何使用 GenApi 的高级示例。
- DistortionCorrection:演示如何禁用 Distortion Correction 以使用您自己的标定数据。
- ExtrinsicTransformation:演示如何在点云中检测主平面、计算外参变换并将其传递给相机。
- MultiCam/ColorAndDepth/ColorAndDepthPtp:演示如何从 Basler blaze 和 Basler GigE 彩色相机同时采集图像,以及如何访问图像和深度数据。相机使用 PTP 和 Synchronous Free Run 功能进行同步。
- MultiCam/ColorAndDepth/Calibration:演示如何标定由 Basler GigE 彩色相机和 Basler blaze 相机组成的系统。
- MultiCam/ColorAndDepth/ColorAndDepthFusion:演示如何将 Basler GigE 彩色相机和 Basler blaze 的数据融合为彩色点云。
- MultiCam/ColorAndDepth/RgbdCamera: 类似于 ColorAndDepthFusion,此示例演示了如何将 Basler blaze 和 Basler GigE 彩色相机的数据融合为彩色点云。该示例利用了
RgbdCamera类,该类允许组合 2D 彩色相机和 blaze,并像操作单个 RGB-D 相机一样对这两个相机进行接口连接。这两个组合相机使用 PTP (IEE1588) 和 Synchronous Free Run 功能进行同步触发。该RgbdCamera类的源代码位于同一文件夹中。要在您自己的应用程序中使用 RgbdCamera 类,请将 RgbdCamera.h 和 RgbdCamera.cpp 文件添加到您的项目中。此外,您还必须添加来自 Multicam/MultiCamHelper 文件夹的 .h 和 .cpp 文件。 - MultiCam/DepthFusion/Calibration:演示如何标定由多个 Basler blaze 相机组成的系统。
- MultiCam/DepthFusion/DepthFusion:演示如何合并深度数据以显示来自任意数量相机的融合点云。
- MultiCam/MultiChannel/MultiChannelFreeRun:演示如何同时操作多台 blaze 相机,而它们的光源互不干扰。这些相机在 Free Run 模式下运行。
- MultiCam/MultiChannel/MultiChannelSwTrigger:演示如何同时操作多台 blaze 相机,而它们的光源互不干扰。这些相机使用软件触发进行触发。
- MultiCam/SynchronousFreeRun/SynchronousFreeRun:演示如何使用 PTP 时钟同步和 Synchronous Free Run 功能来同时操作多台 blaze 相机,而它们的光源互不干扰。
- MultiCam/MultiCamHelper:一个提供便利类的库,可简化使用 PTP (IEEE1588) 同步多个相机的时钟以及从多个相机同步采集图像的过程。所有使用 Synchronous Free Run 功能从多台相机获取图像的示例都使用了此库。要将该库添加到您的项目中,只需将此文件夹中的 .h 和 .cpp 文件添加到您的项目中即可。
- Aravis/BasicSample:(仅限 Linux)演示如何使用开源 Aravis 库配置 blaze 相机并从其中获取数据。
- Aravis/PointCloudSample:(仅限 Linux)演示如何从使用 Aravis 库获取的数据中计算 3D 坐标(即点云)。该示例还演示了如何使用 OpenCV 保存和可视化点云。
如何构建应用程序#
Windows#
使用 Visual Studio 解决方案#
Refer to the Common Settings for Building Applications with pylon section of the pylon C++ Programmer's Guide to learn how to set up a project for building applications using pylon.
Refer to the Common Settings for Building Applications with pylon section of the pylon C++ Programmer's Guide to learn how to set up a project for building applications using pylon.
使用 CMake#
pylon Supplementary Package for blaze 包含一个 Findpylon.cmake 模块,用于确定 pylon 以及 pylon Supplementary Package for blaze 的安装位置。该查找模块导出了 pylon::pylon CMake 目标。将此目标作为参数传递给 target_link_libraries,CMake 将负责设置包含路径、库路径等。
一个基础的 CMakeLists.txt CMake 文件可能如下所示:
project (hello)

# Locate the CMake find module for pylon ...
# for Unix system. All other OS PYLON_ROOT will be empty
list(APPEND CMAKE_PREFIX_PATH $ENV{PYLON_ROOT})
# for Windows system. All other OS PYLON_DEV_DIR will be empty
list(APPEND CMAKE_PREFIX_PATH $ENV{PYLON_DEV_DIR})

find_package(pylon 7.1 REQUIRED)

add_executable(hello helloworld.cpp)
target_link_libraries(hello pylon::pylon)
project (hello)

# Locate the CMake find module for pylon ...
find_path(pylon_cmake Findpylon.cmake
    HINTS "$ENV{PYLON_DEV_DIR}/lib/cmake"
          "$ENV{ProgramFiles}/Basler/pylon 7/Development/lib/cmake"
          "$ENV{ProgramFiles}/Basler/pylon 6/Development/lib/cmake"
)
# ... and extend the CMake module path accordingly.
list(APPEND CMAKE_MODULE_PATH ${pylon_cmake})
# Locate pylon.
find_package(pylon 6.2 REQUIRED)

add_executable(hello helloworld.cpp)
target_link_libraries(hello pylon::pylon)
Linux#
使用 CMake#
project (hello)

# Locate the CMake find module for pylon ...
# for Unix system. All other OS PYLON_ROOT will be empty
list(APPEND CMAKE_PREFIX_PATH $ENV{PYLON_ROOT})
# for Windows system. All other OS PYLON_DEV_DIR will be empty
list(APPEND CMAKE_PREFIX_PATH $ENV{PYLON_DEV_DIR})

find_package(pylon 7.1 REQUIRED)

add_executable(hello helloworld.cpp)
target_link_libraries(hello pylon::pylon)
project (hello)

# Locate the CMake find module for pylon ...
find_path(pylon_cmake Findpylon.cmake
    HINTS "/opt/pylon/lib/cmake"
)
# ... and extend the CMake module path accordingly.
list(APPEND CMAKE_MODULE_PATH ${pylon_cmake})
# Locate pylon.
find_package(pylon 6.2 REQUIRED)

add_executable(hello helloworld.cpp)
target_link_libraries(hello pylon::pylon)
使用 Make 文件#
请参考 pylon C++ 程序员指南中的使用 pylon 构建应用程序的通用设置部分,了解如何调整用于构建 pylon 应用程序的编译器和链接器设置。
用于 blaze 相机的 Instant Camera 类#
pylon 提供了不同类型的类来访问相机设备。除了底层 IPylon 设备外,还有所谓的 即时相机 类,它们为相机提供了方便的高级 API。
即: Pylon::CInstantCamera 类提供对所有 Basler 相机(包括 blaze 相机)的通用访问。
即: Pylon::CBaslerUniversalInstantCamera 类通过参数访问器对象扩展了通用的 Pylon::CInstantCamera 类,这使得使用 IntelliSense/代码补全设置和获取相机参数变得非常容易。
即: Pylon::CBaslerUniversalInstantCamera 类并未提供针对每个 blaze相机功能的参数访问器。因此,pylon Supplementary Package for blaze 包含了 Pylon::CBlazeInstantCamera 类。Basler 建议将该类与 Basler blaze 相机配合使用。
如果您选择 CBaslerUniversalInstantCamera 类而不是 CBlazeInstantCamera 类,您仍然可以设置和获取 blaze 相机提供的所有相机参数。如果没有由 CBaslerUniversalInstantCamera 类提供的访问器对象,请使用所谓的 通用 Property 访问 用于通过名称访问 Property,详见 Generic Parameter Access 部分位于 pylon C++ Programmer's Guide.
示例:
using namespace Pylon;
GenApi::INodeMap& nodemap = camera.GetNodeMap();
CIntegerParameter filterStrength(nodemap, "FilterStrength" );
std::cout << "Filter strength: " << filterStrength.GetValue() << std::endl;
打开和访问 blaze 相机#
创建并打开 blaze 相机对象需要三个步骤:
- 为要访问的相机创建一个相机对象。
通常,您应该创建一个Pylon::CBlazeInstantCamera类的实例。 - 注册应用默认配置的 blaze 专属
Pylon::CBlazeDefaultConfiguration配置事件处理程序。
请参考 注册相机配置处理程序 有关 blaze 配置事件处理程序类的更多详细信息,请参阅该小节。 - 调用
Open()方法以建立与相机设备的连接。
以下示例说明了这三个步骤:
#include <pylon/PylonIncludes.h>
using namespace Pylon;

// ....

// Before using any pylon methods, the pylon runtime must be initialized.
PylonInitialize();

try {
  // 1: Create a camera object for the first available blaze camera.
  CBlazeInstantCamera camera(CTlFactory::GetInstance().CreateFirstDevice(
      CDeviceInfo().SetDeviceClass(BaslerGenTlBlazeDeviceClass))
  );

  // 2. Register the default configuration.
  camera.RegisterConfiguration(
    new CBlazeDefaultConfiguration,
    RegistrationMode_ReplaceAll,
    Cleanup_Delete);

  // 3. Open the camera, i.e., establish a connection to the camera device.
  camera.Open();

  // Use the camera.
  std::cout << "Connected to camera "
    << camera.GetDeviceInfo().GetFriendlyName() << std::endl;
  // .....

  // Close the connection.
  camera.Close();
} catch (const GenICam::GenericException& e) {
  std::cerr << "Exception occurred: " << std::endl
    << e.GetDescription() << std::endl;
}

// Releases all pylon resources.
PylonTerminate();
如果发生错误,将抛出继承自 GenICam::GenericException 的异常。
典型错误情况:
- 未找到 blaze 相机:
CreateFirstDevice()函数会抛出异常。 - 相机无法打开,例如因为它已被 blaze Viewer 等其他应用程序打开:
Open()方法会抛出异常。
以下小节提供了关于如何创建和打开相机对象的更详细信息。
为首个可用的 blaze 相机创建一个相机对象#
使用 Pylon::CTlFactory::CreateFristDevice() 方法,用于为第一个可用的相机创建相机对象。您应始终指定 blaze 相机的 pylon 设备类标识符,以防止 CreateFirstDevice() 为连接到您的系统或可通过网络访问的其他类型相机创建相机类:
CBlazeInstantCamera camera(CTlFactory::GetInstance().CreateFirstDevice(
    CDeviceInfo().SetDeviceClass(BaslerGenTlBlazeDeviceClass)));
);
如果未找到 blaze 相机,请检查相机和网络适配器的 IP 配置设置。有关设置网络的更多信息,请参阅 Network Configuration 主题。
为特定的 blaze 相机创建一个相机对象#
pylon C++ Programmer's Guide 的 Advanced Topics 主题中的 Creating Specific Cameras 小节提供了有关选择特定相机的信息。
如果您想打开特定的 blaze 相机(例如通过指定其序列号),除了将用于 blaze 相机的 pylon 设备类标识符传递给 CreateFirstDevice()之外,您还可以指定其他 Property。
以下代码片段演示了如何通过序列号打开 blaze 相机。
CBlazeInstantCamera camera(CTlFactory::GetInstance().CreateFirstDevice(
  CDeviceInfo()
  .SetDeviceClass(BaslerGenTlBlazeDeviceClass)
  .SetSerialNumber("23298299")
));
要通过用户自定义名称打开 blaze 相机,请使用以下代码行:
CBlazeInstantCamera camera(CTlFactory::GetInstance().CreateFirstDevice(
  CDeviceInfo()
  .SetDeviceClass(BaslerGenTlBlazeDeviceClass)
  .SetUserDefinedName("MyCamera")));
用户自定义名称
您可以使用以下参数为相机指定用户自定义名称: DeviceUserID 您可以在 blaze Viewer、pylon IP Configurator 或 pylon API 中执行此操作:
通过 IP 地址创建设备
目前,您无法使用 CreateFirstDevice() 函数指定相机 IP 地址。原因在于目前 Pylon::CDeviceInfo() 类不包含任何有关相机 IP 地址的信息。
如果您想要创建并打开具有特定 IP 地址的相机,首先必须枚举所有相机,遍历返回的列表,并在查询 IP 地址以及其他网络相关信息之前打开每个相机。Enumerate blaze Cameras 一节中展示了此过程。
如果未找到所需的 blaze 相机,请检查您是否使用了正确的属性值,并检查相机和网卡的 IP 配置设置。有关设置网络的更多信息,请参阅网络配置主题。
枚举 blaze 相机#
以下代码片段演示了如何检索所有已连接的 blaze 相机列表。对于列表中的每个元素,将打开相机并打印一些相机参数值。
#include <pylon/PylonIncludes.h>
#include <ostream>
using namespace Pylon;

// ....

// Before using any pylon methods, the pylon runtime must be initialized.
PylonInitialize();

// ....

// Enumerate all blaze cameras.
CTlFactory& TlFactory = CTlFactory::GetInstance();
DeviceInfoList_t lstDevices;
DeviceInfoList_t filter;
filter.push_back(CDeviceInfo().SetDeviceClass(BaslerGenTlBlazeDeviceClass));
TlFactory.EnumerateDevices(lstDevices, filter);
if (!lstDevices.empty()) {
    DeviceInfoList_t::const_iterator it;
    for (it = lstDevices.begin(); it != lstDevices.end(); ++it) {
        std::cout << it->GetFullName();

    // Open camera, i.e., establish a connection to the camera device.
    CBlazeInstantCamera camera(CTlFactory::GetInstance().CreateDevice(*it));
    camera.RegisterConfiguration(
      new CBlazeDefaultConfiguration,
      RegistrationMode_ReplaceAll, Cleanup_Delete);
    camera.Open();

    // Print out some information.
    std::cout << "Connected to camera "
      << camera.GetDeviceInfo().GetFriendlyName() << std::endl;
    std::cout << "IP Address: "
      << camera.GevCurrentIPAddress.GetValue() << std::endl;
    std::cout << "User-defined name: "
      << camera.DeviceUserID.GetValue() << std::endl;
    std::cout << "Serial Number: "
      << camera.DeviceSerialNumber.GetValue() << std::endl;
}  // The connection will be closed automatically when leaving the scope here.
else {
    std::cerr << "No devices found!" << std::endl;
}
注册相机配置处理程序#
pylon Instant Camera 类允许您注册配置事件处理程序对象,这些对象可用于在某些事件发生时应用相机设置,例如当调用 Open() 方法时。
pylon Supplementary Package for blaze 包含 Pylon::CBlazeDefaultConfiguration 类。Basler 建议始终为您创建的每个 CBlazeInstantCamera 类实例注册此配置。
camera.RegisterConfiguration(
      new CBlazeDefaultConfiguration,
      RegistrationMode_ReplaceAll, Cleanup_Delete);
即: CBlazeDefaultConfiguration::OnOpened() 方法将数据流配置为包含深度、强度和置信度信息。深度信息以点云形式发送。点云包含每个传感器像素的 3D 坐标。 CBlazeDefaultConfiguration::OnOpened() 方法还会将相机置于所谓的自由运行模式(free run mode)。在自由运行模式下,一旦启动采集,相机就会连续传输数据,而无需软件或硬件触发。
如果注册了默认配置,则 CBlazeDefaultConfiguration::OnOpened() 方法将由 CBlazeInstantCamera::Open().
即: CBlazeDefaultConfiguration 自动调用。类是一个仅包含头文件的类。您可以通过打开位于 pylon SDK 的 includes 文件夹中的 BlazeDefaultConfiguration.h 文件来查看代码:
- Windows:
%Program Files%\pylon\Development\include\pylon - Linux:
/opt/pylon/include/pylon
您可以注册多个配置事件处理程序类。
以下示例演示了如何注册一个应用附加设置的配置事件处理程序:
class MyConfigurationHandler : public CBlazeConfigurationEventHandler
{
public:
    // Sets exposure time to minimum possible value.
    void OnOpened(CBlazeInstantCamera& camera) override
    {
        camera.ExposureTime.SetToMinimum();
    }
};

// ....

// Register the default configuration first.
camera.RegisterConfiguration(
      new CBlazeDefaultConfiguration,
      RegistrationMode_ReplaceAll, Cleanup_Delete);

// Then, register additional configuration event handlers.
camera.RegisterConfiguration(
      new MyConfigurationHandler,
      RegistrationMode_Append, Cleanup_Delete);

// ....

camera.Open(); // Configurations will be applied.
有关 pylon 相机事件处理程序类的更多信息,请参阅 pylon C++ Programmer's Guide 中的 Instant Camera Event Handler Basics 一节。
您不必通过提供配置事件处理程序来应用所需的设置。相反,您可以在调用 CBlazeInstantCamera::Open() 方法来建立与相机的连接。
之后的任何时间设置要更改的参数。
连接到相机#
创建相机对象并注册配置事件处理程序后,通过调用 CBlazeInstantCamera::Open() 方法来建立与相机的连接。
连接将保持活动状态,直到调用 CBlazeInstantCamera::Close() 方法被调用。析构函数 CBlazeInstantCamera 会自动调用 Close() (如果尚未显式调用)。
如果相机未定期收到来自相机的心跳请求,它将关闭连接。如果应用程序崩溃或被调试器中断,则会出现心跳请求丢失的情况。有关更多详细信息,请参阅调试应用程序和控制 GigE Vision 心跳一节。
访问参数#
有关如何使用 pylon API 访问相机参数的详细信息,请参阅 pylon C++ Programmer's Guide 中的 Accessing Parameters 一节。
pylon C++ 示例 Parametrize_NativeParameterAccess 和 Parametrize_GenericParameterAccess 演示了使用 pylon 访问相机参数的典型方法。
以下代码示例演示了如何使用 CBlazeInstantCamera 类的实例。
// Include files to use the pylon API
#include <pylon/PylonIncludes.h>
#include <pylon/BlazeInstantCamera.h>

// Namespaces for using the pylon API and the blaze camera parameters
using namespace Pylon;
using namespace BlazeCameraParams_Params;

// ...

// Set the operating mode of the camera. The choice you make here
// affects the working range of the camera, i.e., the Minimum Working
// Range and Maximum Working Range parameters.
OperatingModeEnums oldOperatingMode = camera.OperatingMode.GetValue();
camera.OperatingMode.SetValue(OperatingMode_LongRange);

// Exposure time of the camera. If the operating mode is changed, the
// exposure time is set to the recommended default value.
camera.ExposureTime.SetValue(750); // us

// Enable and configure image filtering.

// The spatial noise filter uses the values of neighboring pixels to
// filter out noise in an image.
camera.SpatialFilter.SetValue(true);

// The temporal noise filter uses the values of the same pixel at
// different points in time to filter out noise in an image.
camera.TemporalFilter.SetValue(true);
camera.TemporalFilterStrength.SetValue(220);

// The outlier removal removes pixels that differ significantly from
// their local environment.
camera.OutlierRemoval.SetValue(true);

// Some properties have restrictions.
// We use API functions that automatically perform value corrections.
// Alternatively, you can use GetInc() / GetMin() / GetMax() to make sure you
// set a valid value.
camera.ConfidenceThreshold.SetValue(321, IntegerValueCorrection_Nearest);

// Not all functions are available in older cameras.
// Therefore, we must use "Try" functions that only perform the action
// when parameters are writable. Otherwise, we would get an exception.
camera.MultiCameraChannel.TrySetValue(1);

std::cout << "Operating Mode           : "
    << camera.OperatingMode.GetValue() << std::endl;
std::cout << "Exposure Time            : "
    << camera.ExposureTime.GetValue() << std::endl;
std::cout << "Spatial Filter           : "
    << camera.SpatialFilter.GetValue() << std::endl;
std::cout << "Temporal Filter          : "
    << camera.TemporalFilter.GetValue() << std::endl;
std::cout << "Temporal Filter Strength : "
    << camera.TemporalFilterStrength.GetValue() << std::endl;
std::cout << "Outlier Removal          : "
    << camera.OutlierRemoval.GetValue() << std::endl;
std::cout << "Confidence Threshold     : "
    << camera.ConfidenceThreshold.GetValue() << std::endl;
if (camera.MultiCameraChannel.IsReadable())
    std::cout << "Multi-Camera Channel : "
    << camera.MultiCameraChannel.GetValue() << std::endl;

// Restore the old operating mode.
camera.OperatingMode.SetValue(oldOperatingMode);

// Close the camera.
camera.Close();
设置和获取经常使用的 blaze 专用相机参数。blaze Viewer 提供了一个 Documentation 窗格。当您在 Features 窗格中选择相机参数时,Documentation 窗格将显示有关所选参数的信息,以及演示如何获取和设置该相机参数值的 C++ 和 C# 代码片段。
采集数据#
请参阅 Grabbing Images 部分的 pylon C++ Programmer's Guide,以熟悉如何使用 pylon API 获取数据。
pylon 将抓取到的图像表示为名为 GrabResults 的数据结构。由 2D 相机获取的 GrabResult 包含单个灰度图或彩色图。
由 blaze 相机抓取的 GrabResult 包含多个组件。默认情况下,每个 GrabResult 存储强度图、置信度图以及深度信息。
根据为 Range 组件设置的 Pixel Format,深度数据可以表示为 2D 深度图或 3D 点云。默认情况下,深度数据表示为点云。
要启用深度图,请将 Range 组件的 Pixel Format 设置为 PixelFormat_Coord3D_16C:
// Enable depth maps by enabling the Range component and setting the
// appropriate pixel format.
camera.ComponentSelector.SetValue(ComponentSelector_Range);
camera.ComponentEnable.SetValue(true);
camera.PixelFormat.SetValue(PixelFormat_Coord3D_C16);
要启用点云,请将 Range 组件的 Pixel Format 设置为 PixelFormat_Coord3D_ABC32f:
// Enable point clouds by enabling the Range component and setting the
// appropriate pixel format.
camera.ComponentSelector.SetValue(ComponentSelector_Range);
camera.ComponentEnable.SetValue(true);
camera.PixelFormat.SetValue(PixelFormat_Coord3D_ABC32f);
有关更多详细信息,请参阅 Component Selector 和 Pixel Format 主题。
信息
无法让相机同时发送点云和深度图形式的深度信息。
Processing Measurement Results 主题解释了如何从深度图计算点云。
此转换也显示在 blaze 相机的 GrabDepthMap C++ programming sample 中。
如何从点云检索深度图显示在 blaze 相机的 ConvertPointCloud2DepthMap C++ 编程示例中。
抓取循环#
pylon 支持用于设置抓取循环的不同方法,并提供了用于处理 Memory 缓冲区的不同策略。
有关更多详细信息,请参阅 Grabbing Images 部分的 pylon C++ Programmer's Guide。
以下代码片段说明了一个典型的采集循环:
#include <pylon/PylonIncludes.h>
#include <pylon/BlazeInstantCamera.h>

using namespace Pylon;
using namespace BlazeCameraParams_Params;

// ....
PylonInitialize();

CBlazeInstantCamera camera(CTlFactory::GetInstance().CreateFirstDevice(
  CDeviceInfo().SetDeviceClass(BaslerGenTlBlazeDeviceClass)));
camera.RegisterConfiguration(
  new CBlazeDefaultConfiguration, RegistrationMode_ReplaceAll, Cleanup_Delete);
camera.Open();

size_t nBuffersGrabbed= 0;

// This smart pointer will receive the grab result data.
CGrabResultPtr ptrGrabResult;

camera.StartGrabbing();

while (camera.IsGrabbing() && nBuffersGrabbed < 10) {
  // Wait for an image and then retrieve it. A timeout of 1000 ms is used.
  camera.RetrieveResult(1000, ptrGrabResult, TimeoutHandling_ThrowException);

  // Data grabbed successfully?
  if (ptrGrabResult->GrabSucceeded()) {
      nBuffersGrabbed++;
      // Access the data.
      // ....
  } else {
    // Error handling
    std::cerr << "Grab error occurred: " << ptrGrabResult->GetErrorDescription() << std::endl;
  }
}
// Clean-up
camera.StopGrabbing();
camera.Close();
访问组件#
要访问 GrabResult 的各个组件,您可以使用 Pylon::CPylonDataContainer 和 Pylon::CPylonDataComponent 类。一个容器可以容纳一个或多个组件。您可以使用该容器来查询组件数量并检索特定组件。容器中的每个组件都包含实际数据(例如深度值)以及元数据。
使用 Pylon::CGrabResultData::GetDataContainer() 方法来访问 GrabResult 的 CPylonDataContainer。使用 Pylon::CPylonDataContainer::GetDataComponent() 通过指定组件的索引来访问组件的方法。
有关 pylon 如何提供对包含多个组件的 GrabResults 的访问权限的更多信息,请参阅 pylon C++ Programmer's Guide 的 Advanced Topics 主题中的 Multi-Component Grab Results 部分。
示例:
#pragma pack(push, 1)
struct Point
{
    float x;
    float y;
    float z;
};
#pragma pack(pop)

// ...

// By registering the CBlazeDefaultConfiguration, depth, intensity, and confidence data will be delivered.
// Depth data is represented as point clouds.
camera.RegisterConfiguration(new CBlazeDefaultConfiguration, RegistrationMode_ReplaceAll, Cleanup_Delete);
camera.Open();

//....

if (ptrGrabResult->GrabSucceeded())
{
  // Get access to the container.
  auto container = ptrGrabResult->GetDataContainer();

  // Access the container's components.
  // Iterate through all components in the container.
  for (size_t i = 0; i < container.GetDataComponentCount(); ++i)
  {
      // Get one component from the container.
      const Pylon::CPylonDataComponent component = container.GetDataComponent(i);
      if ( !component.IsValid() )
          continue;

      // Is this the intensity component?
      if ( component.GetComponentType() == Pylon::ComponentType_Intensity )
      {
          const Pylon::EPixelType pixelType = component.GetPixelType();

          // Get a pointer to the pixel data.
          const void* pPixels = component.GetData();

          // Process intensity values here (pixel data).
          // [...]
      }
  }

  auto rangeComponent = container.GetDataComponent(0);
  auto intensityComponent = container.GetDataComponent(1);
  auto confidenceComponent = container.GetDataComponent(2);

  // Retrieve the 3D coordinates corresponding to the center pixel.
  const auto width = rangeComponent.GetWidth();
  const auto height = rangeComponent.GetHeight();
  const uint32_t u = (int)(0.5 * width);
  const uint32_t v = (int)(0.5 * height);
  auto pPoint =
    reinterpret_cast<const Point*>(rangeComponent.GetData()) + u + v * width;
  uint16_t* pIntensity =
    (uint16_t*)intensityComponent.GetData() +  v * width + u;
  uint16_t* pConfidence
    = (uint16_t*)confidenceComponent.GetData() + v * width + u;
  if (pPoint->z != 0)
      std::cout << "x=" << pPoint->x
        << " y=" << pPoint->y
        << " z=" << pPoint->z << "\n";
  else
      std::cout << "x=   n/a y=   n/a z=   n/a\n";
  std::cout << " intensity=" << *pIntensity
            << " confidence=" << *pConfidence << "\n";
}
else
{
    // Error handling
    std::cerr << "Grab error occurred: " << ptrGrabResult->GetErrorDescription() << std::endl;
}
使用 ComponentSelector 和 ComponentEnable 相机参数,您可以启用/禁用各个组件。对于 blaze 相机,容器中组件的顺序始终如下:
- 范围
- 强度
- 置信度
例如,如果启用了 Range 和 Confidence 组件并禁用了 Intensity 组件,则 container.GetDataComponent(0) 将检索 Range 组件,并且 container.GetDataComponent(1) 将返回 Confidence 组件。尝试访问 container.GetDataComponent(2) 将导致错误,因为通过禁用 Intensity 组件,容器中只有两个组件。
如果应用程序中处理采集结果的部分无法提前知道要期望哪些组件,您应该选择一种更通用的方式来访问组件,即通过遍历容器并使用以下内容检查每个组件的类型: CPylonDataComponent::GetComponentType() 方法来建立与相机的连接。
示例:
camera.RetrieveResult(1000, ptrGrabResult, TimeoutHandling_ThrowException);
// Data grabbed successfully?
if (ptrGrabResult->GrabSucceeded()) {
  // Access the data.
  auto container = ptrGrabResult->GetDataContainer();

  CPylonDataComponent rangeComponent;
  CPylonDataComponent intensityComponent;
  CPylonDataComponent confidenceComponent;

  // Iterate through all components in the container.
  for (size_t i = 0; i < container.GetDataComponentCount(); ++i) {
      const Pylon::CPylonDataComponent component = container.GetDataComponent(i);
      if (!component.IsValid())
          continue;
      switch (component.GetComponentType())
      {
      case ComponentType_Intensity:
          intensityComponent = component;
          break;
      case ComponentType_Confidence:
          confidenceComponent = component;
          break;
      case ComponentType_Range:
          rangeComponent = component;
          break;
      }
  }
  if (rangeComponent.IsValid()) {
    const auto width = rangeComponent.GetWidth();
    const auto height = rangeComponent.GetHeight();
    // Process depth data.
  }
  if (intensityComponent.IsValid()) {
    // Process intensity image.
  }
  if (confidenceComponent.IsValid())
  {
    // Process confidence data.
  }
}
解释深度数据#
Processing Measurement Results 主题提供了有关存储在 Range 组件中的深度数据格式的信息。
调试应用程序并控制 GigE Vision Heartbeat#
像 blaze 相机这样的 GigE Vision 相机需要应用程序定期访问相机,以便相机检查控制相机的应用程序是否仍在运行。因此,传输层会定期向相机发送网络请求(心跳)。如果相机在相机的心跳超时设置指定的时间内未收到这些心跳,它会认为连接已中断并关闭连接,即它将不再接受来自应用程序的任何命令。心跳超时的默认值为 3000 ms。
当您在调试应用程序并遇到断点时,调试器将暂停所有线程,包括发送心跳的线程。为防止相机在应用程序暂停时或在代码中进行单步调试时关闭连接,传输层会自动增加心跳超时(如果您使用的是 pylon 7.1 或更高版本,则为 1 小时;否则为 5 分钟)。如果您使用的是 pylon 7.1 或更高版本,则在应用程序终止或崩溃时,与相机的连接会自动关闭。
使用 pylon 7.0 或更低版本时的重新连接问题
如果应用程序在正确关闭与相机的连接之前终止或崩溃,相机将保持连接打开状态,直到心跳超时过期。在心跳超时过期之前,相机将拒绝任何进一步的连接尝试。重新启动应用程序或启动请求访问相机的另一个应用程序时,您将收到一条错误消息,指出设备当前正在使用中。
这通常发生在使用调试器停止应用程序或应用程序意外终止时。要再次打开相机,您必须等待超时结束,或者暂时断开相机与网络的连接。
为了解决此问题,当应用程序在调试器的控制下运行时,您可以通过将名为 GEV_HEARTBEAT_TIMEOUT 的环境变量设置为所需的超时时间(以毫秒为单位)来覆盖心跳超时的自动调整。或者,您可以使用 pylon API 在应用程序中设置心跳超时,如 DeviceRemovalHandling 示例程序。