C++ Programmer's Guide#
If you are new to pylon, Basler recommends making yourself familiar with the pylon C++ API first by reading the Getting Started section of the pylon C++ Programmer's Guide.
C++ Programming Samples#
The C++ samples are located in the C:\Program Files\Basler\pylon\Development\Samples\Stereo_ace\C++ folder.
The C++ samples are located in the /opt/pylon/share/pylon/Samples/Stereo_ace/C++/ folder.
The C++ samples are located in the /opt/pylon/share/pylon/Samples/Stereo_ace/C++/ folder.
Prerequisites for Building the Samples#
- Visual Studio 2019 or above
- CMake 3.3 or above
- CMake 3.3 or above
- Optional: OpenCV library
- Optional: Point Cloud Library (PCL)
Building the Samples#
- Copy the Development\Samples\Stereo_ace\C++ folder to a location where you have write permissions.
- Launch Microsoft Visual Studio.
- Click the Open a local folder button, navigate to the Samples\Stereo_ace\C++ folder, and press the Select button.
Wait until Visual Studio has finished generating the CMake cache. Once the cache generation has succeeded, the samples can be built and executed.
Open a command shell and enter the following commands:
Check the Troubleshooting topic if you experience problems building and running the samples.
Installing the OpenCV Library#
You can download OpenCV here: https://github.com/opencv/opencv/releases
Make sure that you download a version of the OpenCV library that is compatible with the Visual Studio version you are going to use. If there is no suitable prebuilt version available, you have to build OpenCV from sources using the Visual Studio version you want to use for building your application.
If CMake fails to find OpenCV, set the OpenCV_DIR variable to the folder containing the OpenCVConfig.cmake file.
Examples
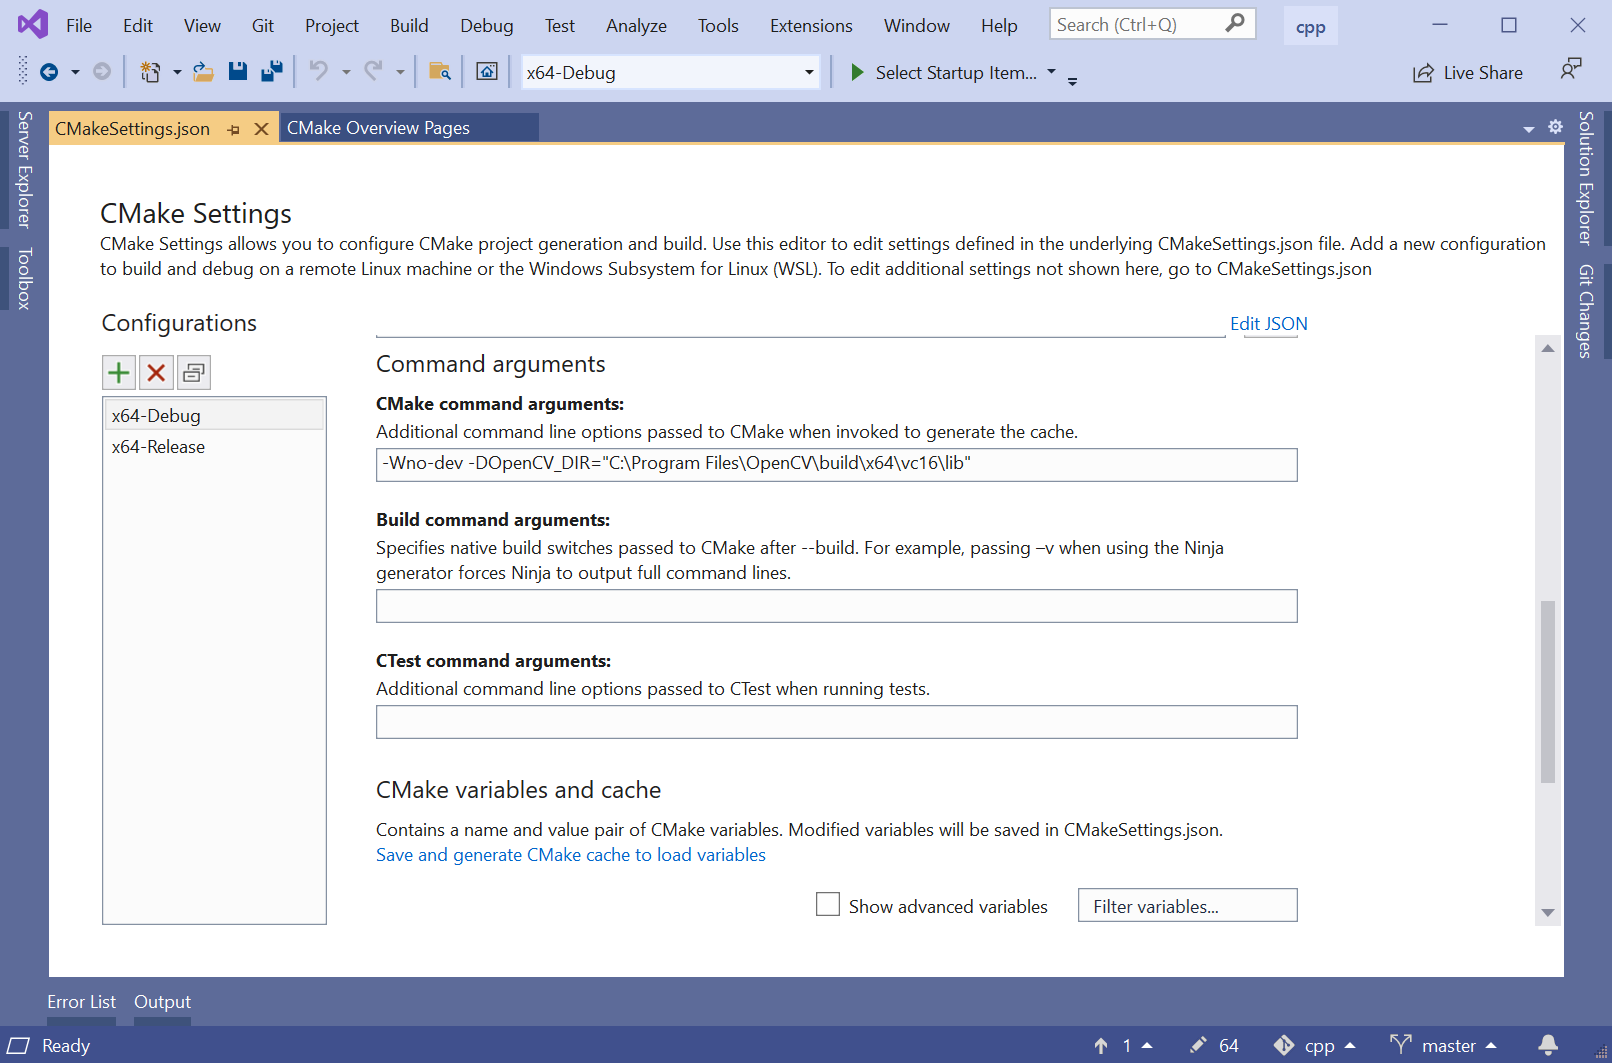
- Open the CMake Settings dialog (Project -> CMakeSettings for "Stereo ace samples")
- Enter the following command in the CMake command arguments field:
-DOpenCV_DIR="C:\Program Files\OpenCV\build\x64\vc16\lib" - Press Ctrl+S to save the changes.

Before you can access the OpenCV_DIR in the CMake GUI, make sure that the Grouped check box is deselected in the CMake GUI.
Adding OpenCV to PATH Environment Variable#
You have to add the OpenCV bin directory to the PATH environment variable.
- Press the Win key.
- Type "environment".
- Click Edit environment variables for your account.
- In the User variables area, select Path.
- Click the Edit button.
- Click New.
- Enter the path of your OpenCV installation, e.g.:
C:\Program Files\OpenCV\build\x64\vc16\bin - Click OK.
If CMake fails to find the OpenCV library, you either have to install the libopencv development package or to build the OpenCV library from sources.
On Ubuntu systems, the libopencv development package can be installed by issuing the following command:
If you build the OpenCV library from sources and install it to a non-standard location, you can use the OpenCV_DIR CMake variable to specify the location where the OpenCVConfig.cmake files are located.
Example:
If CMake fails to find the OpenCV library, you either have to install the OpenCV development package or to build the OpenCV library from sources.
If you build the OpenCV library from sources and install it to a non-standard location, you can use the OpenCV_DIR CMake variable to specify the location where the OpenCVConfig.cmake files are located.
Example:
Installing the Point Cloud Library#
You can download the PCL All-in-one Installer for Windows here: https://github.com/PointCloudLibrary/pcl/releases
Make sure that you download a version of the PCL that is compatible with the Visual Studio version you are going to use.
If CMake fails to find the PCL, set the PCL_DIR variable to the folder containing the PCLConfig.cmake file.
Examples
- Open the CMakeSettings.json file (CMake -> Change CMake Settings -> "Stereo ace samples").
- Add
-DPCL_DIR=\"C:\\Program Files\\PCL 1.9.1\\cmake\"to thecmakeCommandArgslist:
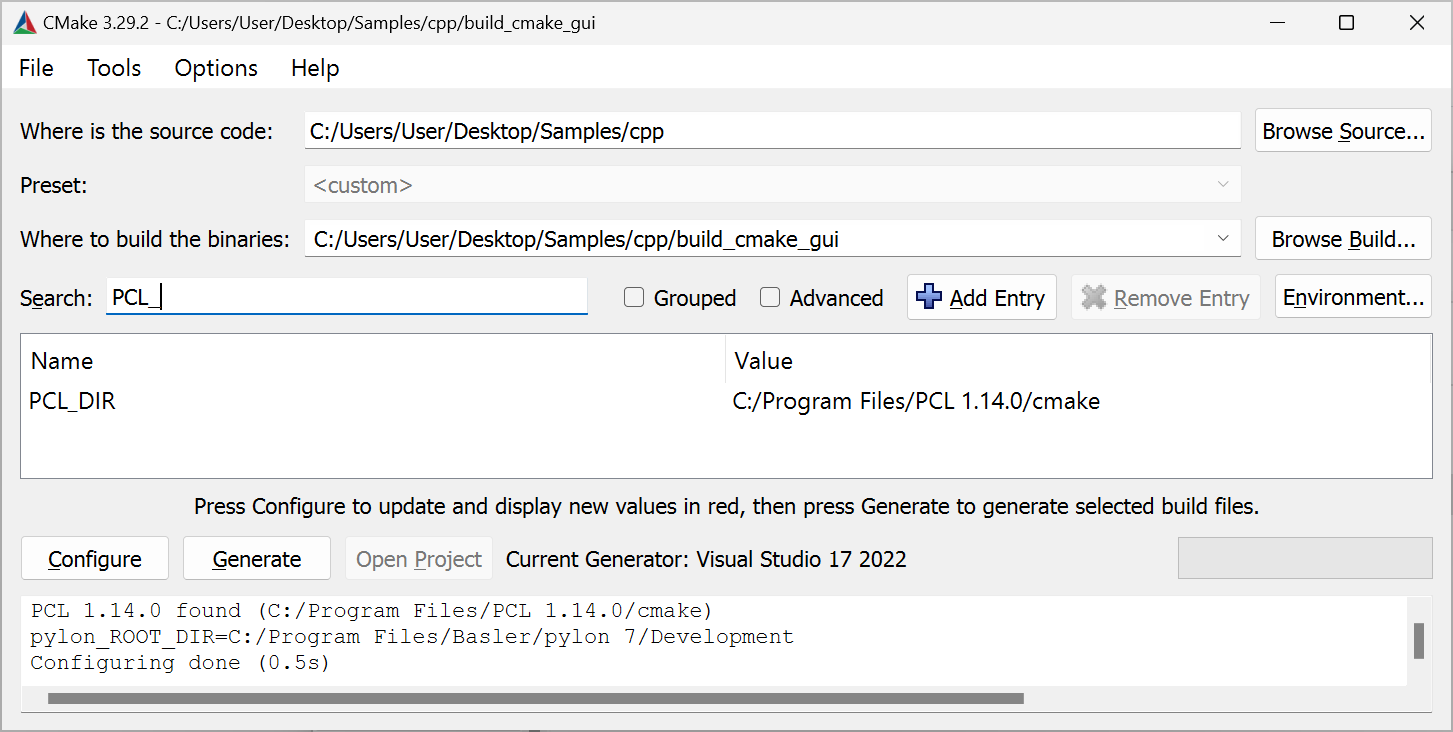
- Open the CMake Settings dialog (Project -> CMakeSettings for "Stereo ace samples").
- Enter the following string in the CMake command arguments field:
-DPCL_DIR="C:\Program Files\PCL 1.14.0\cmake". - Press Ctrl+S to save the changes.
Before you can access the PCL_DIR in the CMake GUI, make sure that the Grouped check box is deselected in the CMake GUI.
If the PCL is installed using the PCL All-in-one Installer, the installer takes care of adding the PCL bin directory to the PATH environment variable. If you're using a different installation method, you have to add the bin directory to the PATH environment variable yourself.
The PCL All-in-one Installer installs the OpenNI2.dll into the %ProgramFiles%\OpenNI2\Redist folder. The DLL is required at runtime. Either add this folder to your PATH environment variable, or copy the OpenNI2.dll to the folder the PCL binaries are located, e.g., %ProgamFiles%\PCL 1.13.0\bin.
If CMake fails to find the PCL library, you either have to install the libpcl development package or to build the PCL library from sources.
On Ubuntu systems, the libpcl development package can be installed by issuing the following command:
If you build the PCL from sources and install it to a non-standard location, the PCL_DIR CMake variable can be used to specify the location where the PCLConfig.cmake files is located.
Example:
Info
Samples using the Point Cloud Library (PCL) may crash depending on the versions of the PCL and VTK libraries installed on your system. The crash is due to a bug in the VTK libraries that are used by PCL for 3D visualization.
Source: https://github.com/PointCloudLibrary/pcl/issues/5237
Solution: PCL 1.13.1 contains fixes to work around the VTK bug.
Update to PCL 1.13.1 or higher. If required, uninstall the PCL libraries provided by your Linux distribution and build PCL version 1.13.1 or higher from sources (these can be retrieved from https://github.com/PointCloudLibrary/pcl).
If CMake fails to find the PCL library, you either have to install the PCL development package or to build the PCL library from sources.
If you build the PCL from sources and install it to a non-standard location, the PCL_DIR CMake variable can be used to specify the location where the PCLConfig.cmake files is located.
Example:
Info
Samples using the Point Cloud Library (PCL) may crash depending on the versions of the PCL and VTK libraries installed on your system. The crash is due to a bug in the VTK libraries that are used by PCL for 3D visualization.
Source: https://github.com/PointCloudLibrary/pcl/issues/5237
Solution: PCL 1.13.1 contains fixes to work around the VTK bug.
Update to PCL 1.13.1 or higher. If required, uninstall the PCL libraries provided by your Linux distribution and build PCL version 1.13.1 or higher from sources (these can be retrieved from https://github.com/PointCloudLibrary/pcl).
List of Samples#
- FirstSample: Introduction to operating a Stereo ace camera and retrieving 3D data.
- ParametrizeCamera: Illustrates how to access camera parameters.
- DeviceRemovalHandling: Illustrates the handling of device removal.
- OpenDeviceByIpAddress: Demonstrates how to open a Stereo ace camera by one of its IP addresses.
- GrabDepthMap: Illustrates how to grab and interpret depth maps.
- SavePointCloud: Illustrates how to save point clouds to file.
- ShowPointcloud: Illustrates how to visualize the point clouds grabbed with a Stereo ace camera.
- TriggerLowLatency: Demonstrates how latency can be reduced by binning on the camera instead of on the host.
- LeftAndRightIntensity: Demonstrates how to grab left and right intensity image from a Stereo ace camera.
Refer to the sample code in the C++ samples directory for more details.
How to Build Applications#
Using Visual Studio Solutions#
Refer to the Common Settings for Building Applications with pylon section of the pylon C++ Programmer's Guide to learn how to set up a project for building applications using pylon.
Using CMake#
The pylon Supplementary Package for Stereo ace includes a Findpylon.cmake module that is used to determine the installation location of pylon and the pylon Supplementary Package for Stereo ace. The find module exports the pylon::pylon CMake target. Pass this target as argument to target_link_libraries, and CMake will take care of setting the include path, library path, etc.
A basic CMakeLists.txt CMake file could look like this:
project (hello)

# Locate the CMake find module for pylon ...
# for Unix systems. All other OS PYLON_ROOT will be empty.
list(APPEND CMAKE_PREFIX_PATH $ENV{PYLON_ROOT})
# for Windows systems. All other OS PYLON_DEV_DIR will be empty.
list(APPEND CMAKE_PREFIX_PATH $ENV{PYLON_DEV_DIR})

find_package(pylon 10.0 REQUIRED)

add_executable(hello helloworld.cpp)
target_link_libraries(hello pylon::pylon)
project (hello)

# Locate the CMake find module for pylon ...
# for Unix system. All other OS PYLON_ROOT will be empty
list(APPEND CMAKE_PREFIX_PATH $ENV{PYLON_ROOT})
# for Windows system. All other OS PYLON_DEV_DIR will be empty
list(APPEND CMAKE_PREFIX_PATH $ENV{PYLON_DEV_DIR})

find_package(pylon 10.0 REQUIRED)

add_executable(hello helloworld.cpp)
target_link_libraries(hello pylon::pylon)
Instant Camera Class for Stereo ace#
pylon provides different types of classes for accessing camera devices. Apart from low-level IPylon devices, there are the so-called Instant Camera classes that provide a convenient high-level API for cameras.
The Pylon::CInstantCamera class provides generic access to all Basler cameras.
For Stereo ace cameras, the pylon Supplementary Package for Stereo ace includes the Pylon::CStereoAceInstantCamera class. Basler recommends using this class for Basler Stereo ace cameras as it provides convenient parameter access and Stereo ace-specific features.
If you use the CBaslerUniversalInstantCamera class instead of the CStereoAceInstantCamera class, you can still set and get all camera parameters provided by the Stereo ace camera. If there is no accessor object provided by the CBaslerUniversalInstantCamera class, use the so-called generic parameter access for accessing parameters by their names as explained in the Generic Parameter Access section of the pylon C++ Programmer's Guide.
示例:
using namespace Pylon;
GenApi::INodeMap& nodemap = camera.GetNodeMap();
CIntegerParameter depthSeg(nodemap, "BslDepthSeg" );
std::cout << "Segmentation: " << depthSeg.GetValue() << std::endl;
Opening and Accessing Stereo ace Cameras#
It takes three steps to create and open a Stereo ace camera object:
- Create a camera object for the camera you want to access.
Usually, you should create an instance of thePylon::CStereoAceInstantCameraclass. - Register a Stereo ace-specific configuration event handler if required (see the DeviceRemovalHandling.cpp sample for details).
- Call the
Open()method to establish a connection to the camera device.
The following example illustrates these steps:
#include <pylon/PylonIncludes.h>
#include <pylon/StereoAceInstantCamera.h>
using namespace Pylon;

// ...

// Before using any pylon methods, the pylon runtime must be initialized.
PylonInitialize();

try {
    // 1: Create a camera object for the first available Stereo ace camera.
    CUniversalInstantInterface instantInterface(
        CInterfaceInfo().SetDeviceClass(Pylon::BaslerGenTlStaDeviceClass));
    CStereoAceInstantCamera camera(instantInterface.CreateFirstDevice());

    // 2. Register a default configuration if available (see samples).
    // camera.RegisterConfiguration(...);

    // 3. Open the camera, i.e., establish a connection to the camera device.
    camera.Open();

    // Use the camera.
    std::cout << "Connected to camera "
        << camera.GetDeviceInfo().GetFriendlyName() << std::endl;
    // ...

    // Close the connection.
    camera.Close();
} catch (const GenICam::GenericException& e) {
    std::cerr << "Exception occurred: " << std::endl
        << e.GetDescription() << std::endl;
}

// Releases all pylon resources.
PylonTerminate();
In case of errors, exceptions inheriting from GenICam::GenericException are thrown.
Typical error conditions:
- No Stereo ace camera found: The
CreateFirstDevice()function throws an exception. - Camera can't be opened, e.g., because it is already opened by another application: The
Open()method throws an exception.
The following subsections provide more detailed information about how to create and open a camera object.
Creating a Camera Object for the First Available Stereo ace Camera#
Use the Pylon::CTlFactory::CreateFirstDevice() method to create a camera object for the first available Stereo ace camera. Always specify the pylon device class identifier for Stereo ace cameras to prevent CreateFirstDevice() from creating a camera object for a different type of camera:
CUniversalInstantInterface instantInterface(
    CInterfaceInfo().SetDeviceClass(Pylon::BaslerGenTlStaDeviceClass));
CStereoAceInstantCamera camera(instantInterface.CreateFirstDevice());
If no Stereo ace camera is found, check the camera's and your network adapter's IP configuration settings. Refer to the Network Configuration topic in the Basler Product Documentation for more information about setting up your network.
Creating a Camera Object for a Specific Stereo ace Camera#
If you want to open a specific Stereo ace camera, you can specify other properties in addition to the device class.
To open a specific Stereo ace camera by its serial number, use the following lines:
CUniversalInstantInterface instantInterface(
    CInterfaceInfo().SetDeviceClass(Pylon::BaslerGenTlStaDeviceClass));
CStereoAceInstantCamera camera(instantInterface.CreateFirstDevice(
    CDeviceInfo().SetSerialNumber("40410842")));
To open a Stereo ace camera by user-defined name, use the following lines:
CUniversalInstantInterface instantInterface(
    CInterfaceInfo().SetDeviceClass(Pylon::BaslerGenTlStaDeviceClass));
CStereoAceInstantCamera camera(instantInterface.CreateFirstDevice(
    CDeviceInfo().SetUserDefinedName("MyCamera")));
User-Defined Names
You can assign a user-defined name to a camera using the DeviceUserID parameter. You can do this in the Stereo Camera Viewer or the pylon API:
Creating a Device by Its IP Address
Currently, you can't specify the camera IP address using the CreateFirstDevice() function. The reason for this is that currently the Pylon::CDeviceInfo() class doesn't contain any information about the camera's IP address.
The OpenDeviceByIpAddress sample demonstrates how to open a Stereo ace camera by one of its IP addresses.
If the desired Stereo ace camera isn't found, check whether you're using the right values for the properties and check your camera's and your network adapter's IP configuration settings. Refer to the Network Configuration topic in the Basler Product Documentation for more information about setting up your network.
Enumerating Stereo ace Cameras#
The following code snippet illustrates how to retrieve a list of all connected Stereo ace cameras. For each element of the list, the camera is opened and some camera parameter values are printed.
#include <pylon/PylonIncludes.h>
#include <pylon/StereoAceInstantCamera.h>
#include <ostream>
using namespace Pylon;

// ....

// Before using any pylon methods, the pylon runtime must be initialized.
PylonInitialize();

// ....

// Enumerate all Stereo ace cameras.
CTlFactory& TlFactory = CTlFactory::GetInstance();
DeviceInfoList_t lstDevices;
DeviceInfoList_t filter;
filter.push_back(CDeviceInfo().SetDeviceClass(BaslerGenTlStaDeviceClass));
TlFactory.EnumerateDevices(lstDevices, filter);
if (!lstDevices.empty()) {
    DeviceInfoList_t::const_iterator it;
    for (it = lstDevices.begin(); it != lstDevices.end(); ++it) {
        std::cout << it->GetFullName();

        // Open camera, i.e., establish a connection to the camera device.
        CStereoAceInstantCamera camera(CTlFactory::GetInstance().CreateDevice(*it));
        // Optionally register configuration(s) here.
        camera.Open();

        // Print out some information.
        std::cout << "Connected to camera "
            << camera.GetDeviceInfo().GetFriendlyName() << std::endl;
        std::cout << "IP Address: "
            << camera.GevCurrentIPAddress.GetValue() << std::endl;
        std::cout << "User-defined name: "
            << camera.DeviceUserID.GetValue() << std::endl;
        std::cout << "Serial Number: "
            << camera.DeviceSerialNumber.GetValue() << std::endl;
}  // The connection will be closed automatically when leaving the scope here.
else {
    std::cerr << "No devices found!" << std::endl;
}
Registering Camera Configuration Handlers#
pylon Instant Camera classes allow you to register configuration event handler objects that can be used to apply camera settings on certain events, for example when the Open() method is called.
The following example illustrates how to register a configuration event handler that applies additional settings:
class MyConfigurationHandler : public StereoAceConfigurationEventHandler
{
public:
    // Sets exposure time to minimum possible value.
    void OnOpened(CStereoAceInstantCamera& camera) override
    {
        camera.ExposureTime.SetToMinimum();
    }
};

// ....

// Then, register configuration event handlers.
camera.RegisterConfiguration(
      new MyConfigurationHandler,
      RegistrationMode_Append, Cleanup_Delete);

// ....

camera.Open(); // Configurations will be applied.
Refer to the Instant Camera Event Handler Basics section of the pylon C++ Programmer's Guide for more information about pylon camera event handler classes.
If you don't want to apply your desired settings by providing a configuration event handler, you can set the parameters you want to change at any time after calling the CStereoAceInstantCamera::Open() method.
Refer to the Parametrize Camera section for information about how to set and get camera parameter values.
Connecting to a Camera#
After creating a camera object and registering a configuration event handler, the connection to the camera is established by calling the CStereoAceInstantCamera::Open() method.
The connection is kept alive until the CStereoAceInstantCamera::Close() method is called. The destructor of CStereoAceInstantCamera automatically calls Close() if it hasn't been called explicitly.
The camera closes the connection if it doesn't periodically receive heartbeat requests from the camera. Missing heartbeat requests occur if the application crashes or is interrupted by a debugger.
Parametrize Camera#
Refer to the Accessing Parameters section of the pylon C++ Programmer's Guide to get familiar with how to access camera parameters using the pylon API.
The pylon C++ samples Parametrize_NativeParameterAccess and Parametrize_GenericParameterAccess illustrate typical methods for accessing camera parameters using pylon.
The following code sample illustrates how to set and get frequently-used Stereo ace-specific camera parameters using the CStereoAceInstantCamera class.
// Include files to use the pylon API
#include <pylon/PylonIncludes.h>
#include <pylon/StereoAceInstantCamera.h>

// Namespaces for using the pylon API and the Stereo ace camera parameters
using namespace Pylon;
using namespace StereoAceCameraParams_Params;


// Set the exposure time of the camera.
camera.ExposureTime.SetValue(5000); // us

// Set the gain.
camera.Gain.SetValue(0.0);

// Set the illumination mode (e.g., AlwaysActive, AlternateActive, Off).
camera.BslIlluminationMode.SetValue(BslIlluminationMode_AlwaysActive);

// Set the illumination strength (0.0 ... 1.0).
camera.BslIlluminationStrength.SetValue(1.0);

// Set the minimum and maximum depth for the working area.
camera.BslDepthMinDepth.SetValue(200); // mm
camera.BslDepthMaxDepth.SetValue(2000); // mm

// Enable or disable binning.
camera.BslBinningHorizontal.SetValue(BslBinningHorizontal_Binning2);
camera.BslBinningVertical.SetValue(BslBinningVertical_Binning2);

// Set the depth quality.
camera.BslDepthQuality.SetValue(BslDepthQuality_High);

// Print out current parameter values.
std::cout << "Exposure Time            : "
    << camera.ExposureTime.GetValue() << std::endl;
std::cout << "Gain                     : "
    << camera.Gain.GetValue() << std::endl;
std::cout << "Illumination Mode        : "
    << camera.BslIlluminationMode.GetValue() << std::endl;
std::cout << "Illumination Strength    : "
    << camera.BslIlluminationStrength.GetValue() << std::endl;
std::cout << "Min Depth                : "
    << camera.BslDepthMinDepth.GetValue() << std::endl;
std::cout << "Max Depth                : "
    << camera.BslDepthMaxDepth.GetValue() << std::endl;
std::cout << "Binning Horizontal       : "
    << camera.BslBinningHorizontal.GetValue() << std::endl;
std::cout << "Binning Vertical         : "
    << camera.BslBinningVertical.GetValue() << std::endl;
std::cout << "Depth Quality            : "
    << camera.BslDepthQuality.GetValue() << std::endl;
The Stereo Camera Viewer provides a Documentation pane. When you select a camera parameter in the Features pane, the Documentation pane displays information about the parameter selected as well as C++ and C# code snippets that illustrate how to get and set the value of that camera parameter.
Acquiring Data#
Refer to the Grabbing Images section of the pylon C++ Programmer's Guide to get familiar with how to acquire data using the pylon API.
pylon represents grabbed images as data structures called GrabResults. GrabResults acquired by a Stereo ace camera contain multiple components. By default, each GrabResult stores an intensity image, a disparity map, and additional information.
// Enable disparity maps by enabling the Disparity component and setting the
// appropriate pixel format.
camera.ComponentSelector.SetValue(ComponentSelector_Disparity);
camera.ComponentEnable.SetValue(true);
Refer to the Component Selector and Pixel Format topics of the Basler Product Documentation for more details.
Grab Loop#
pylon supports different approaches for setting up a grab loop and provides different strategies for handling memory buffers.
Refer to the Grabbing Images section of the pylon C++ Programmer's Guide for more details.
The following code snippet illustrates a typical grab loop using the CStereoAceInstantCamera class:
#include <pylon/PylonIncludes.h>
#include <pylon/StereoAceInstantCamera.h>

using namespace Pylon;
using namespace StereoAceCameraParams_Params;


PylonInitialize();

CUniversalInstantInterface instantInterface(
    CInterfaceInfo().SetDeviceClass(Pylon::BaslerGenTlStaDeviceClass));
CStereoAceInstantCamera camera(instantInterface.CreateFirstDevice());
camera.Open();

size_t nBuffersGrabbed = 0;

// This smart pointer will receive the grab result data.
CGrabResultPtr ptrGrabResult;

camera.StartGrabbing();

while (camera.IsGrabbing() && nBuffersGrabbed < 10) {
    // Wait for an image and then retrieve it. A timeout of 1000 ms is used.
    camera.RetrieveResult(1000, ptrGrabResult, TimeoutHandling_ThrowException);

    // Data grabbed successfully?
    if (ptrGrabResult->GrabSucceeded()) {
        nBuffersGrabbed++;
        // Access the data.
        // ...existing code...
    } else {
        // Error handling
        std::cerr << "Grab error occurred: "
            << ptrGrabResult->GetErrorDescription() << std::endl;
    }
}
// Clean-up
camera.StopGrabbing();
camera.Close();
Accessing Components#
To access the individual components of a GrabResult, you can use the Pylon::CPylonDataContainer and Pylon::CPylonDataComponent classes. A container can hold one or more components. You can use the container to query for the number of components and to retrieve a specific component. Each component in the container holds the actual data, e.g., the depth values, as well as its metadata.
Use the Pylon::CGrabResultData::GetDataContainer() method to get access to a GrabResult's CPylonDataContainer. Use the Pylon::CPylonDataContainer::GetDataComponent() method to access a component by specifying the index of the component.
Check each component's type by using the CPylonDataComponent::GetComponentType() method.
Refer to the Multi-Component Grab Results section in the "Advanced Topics" chapter of the pylon C++ Programmer's Guide for more information about how pylon provides access to GrabResults containing multiple components.
示例:
if (ptrGrabResult->GrabSucceeded()) {

    auto componentIdxIntensity = -1;
    auto componentIdxDisparity = -1;
    for (int idx = 0; idx < (int) ptrGrabResult->GetDataComponentCount(); ++idx)
    {
        const auto componentType =
            ptrGrabResult->GetDataComponent(idx).GetComponentType();
        switch (componentType) {
        case EComponentType::ComponentType_Intensity:
            componentIdxIntensity = idx;
            break;
        case EComponentType::ComponentType_Disparity:
            componentIdxDisparity = idx;
            break;
        default:
            // ignore component
            break;
        }
    }

    const auto intensityComponent =
        ptrGrabResult->GetDataComponent(componentIdxIntensity);

    const auto disparityComponent =
        ptrGrabResult->GetDataComponent(componentIdxDisparity);

} else {
    std::cerr << "Grab error: " << ptrGrabResult->GetErrorCode() << " "
              << ptrGrabResult->GetErrorDescription() << std::endl;
}