VisualApplets offers a graphical user interface for applet design. No scripting, no programming-code is required to be edited. The user interface is very simple and especially designed for easy learning by users. No technical background in programming is required.
To create a new VisualApplets project file:
-
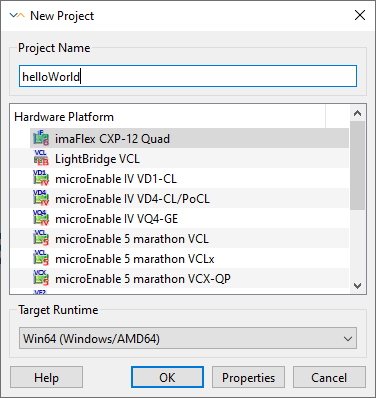
Click → ( Ctrl+N ) or use the icon from the file icon bar in the main window. A New Project window will open which allows you to specify a project name.
-
Enter the project name. The project name will be the suggested file name later on.
-
You also have to specify the target hardware platform and the target runtime. If you are not sure which platform and runtime will be used, you can always change these settings later on ( → and → ). Finalized applets can only be used in a runtime which corresponds to the target runtime defined in the applet.
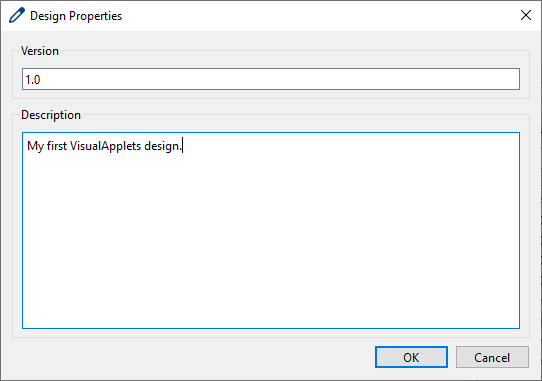
For each project, a version number (string) and a project description can be added.
-
Click to open the Project details window. Here, you can enter the version of your design project and a project description. This information will be displayed in the Project Info window of the information panel.
After all settings have been made:
-
Click to close all windows and to start the new project. VisualApplets will now open your new project.
![[Tip]](../common/images/admon/tip.png) |
提示 |
|---|---|
|
Only one project can be loaded at a time. If you want to open several projects at the same time, simply use a second VisualApplets instance. |
To open an existing project:
-
Click → ( Ctrl+O ) or use the icon from the file icon bar.
-
Select the VisualApplets project file from your file system an click .
|
Opening Designs created in older VisualApplets versions |
|---|---|
|
If you are opening a project file which has been edited with a previous version of VisualApplets, the program might ask you to convert the file to the new version. For more information on migrating from previous versions, see 'Migration from Older Versions'. |
Alternatively, you can select a project you have currently worked on directly:
-
Go to → . VisualApplets offers you a list of recently opened VisualApplets files (*.va).
-
Select the project file you want to proceed working on.
|
Number of displayed files |
|---|---|
|
You can configure the actual number of files displayed. How to do that, see section 'Number of Files under File -> Recent Designs'. |
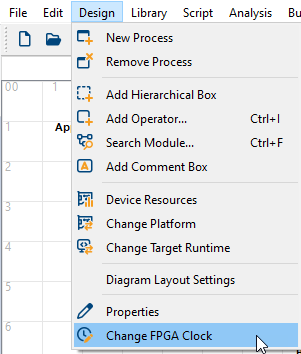
If you are designing for another hardware platform than mE5 marathon, skip this section and proceed with the following one.
If you are designing for a mE5 marathon hardware platform, you can specify the FPGA clock frequency. You can select any value between 125 MHz and 312.5 MHz.
To define the FPGA clock:
-
In menu Design, select menu item Change FPGA Clock.
-
Specify the desired frequency via slider or spin box.
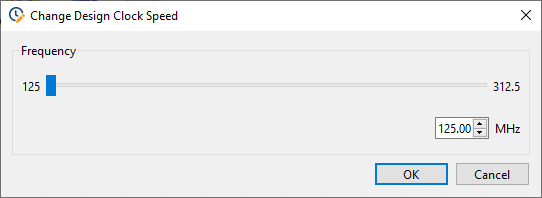
The selected clock frequency (Design Clock) is displayed in operator AppletProperties.
Inserting new operators into a project is very easy:
-
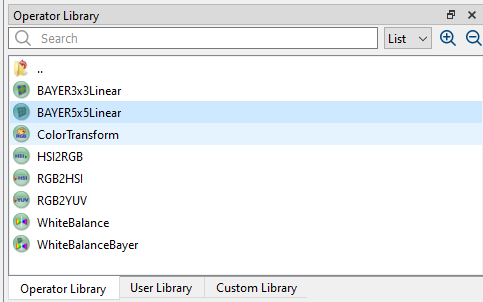
Select the required operator in the library panel (see 'Library Panel' if you want to know how to find the operator you are looking for).
-
To add an operator from the library list into your diagram window, simply drag and drop the operator into the design window. The selected operator is now added to your project.
|
Operator Instances in Your Design |
|---|---|
|
As soon as you drag and drop an operator into your design, the operator gets instantiated and you work with an instance of the chosen operator. This instance in your design we call a design module. You can give an individual name to each module of your design (the module name). This way, you can even give an individual name to each of several instances of the same operator. |
-
Move the modules in your design into the right position by using drag and drop.
|
Quick Insertion of New Modules |
|---|---|
|
There is an alternative method to add operators into a project. You can use the Add Operator window which you open via → ( Ctrl+I ). This window is especially useful if you need to add a series of operators you know by name. The shortcut for accessing the window, in combination with the window's search field facilitate the efficient and fast insertion of multiple operators. The operator you chose in this window is added to the design window currently in focus. |
If you want to delete a module:
-
Select the module and press the DEL key, or right click the module and select from the menu.
The modules of a project have to be connected via links. To connect your modules using links:
-
Click the output port of a module and hold the mouse button.
-
Move the mouse to the input port of the next module and release the mouse button.
Now, the link will be established. You can also connect modules from an output port to an input port, i.e. draw in reverse direction.
There are two alternative ways to connect modules which you might find efficient:
-
Click the output port of the first module you want to connect. Then, click the input port of the module you want to connect to the first module. Now, the link will be established. Or,
-
Drag one of the modules and drop it on the port of the module you want to connect it with. This will generate a link between the touching ports.
![[Note]](../common/images/admon/note.png) |
Some Linking Rules |
|---|---|
|
|
A drag and drop of an existing link to another port can change the connection. The link path of an established link can be changed by moving the line using drag and drop. However, new edges can't be inserted.
|
提示 |
|---|---|
|
You can delete a link by selecting it and pressing the DEL key (or, right-clicking it and selecting Delete). |
Modules and links in a project can be copied and pasted to and from the clipboard.
-
Select the operators and links to be copied, for example by drawing a rectangular selection area.
-
Copy the selection via → ( Ctrl+C ) or from the context menu, select Copy.
-
To insert, select → ( Ctrl+V ) or from the context menu, select Paste.
If you use the context menu, the inserted modules and links will be positioned at the current mouse position. Otherwise, the inserted modules and links are positioned in the center of the currently visible part of the design window currently in focus.
Modules are copied with all their parameter settings. Links between modules are copied, too. However, a link which is not connected to two copied modules can't be copied as it is not allowed to have single-sidedly connected links. This can result in a changed output link format of a copied module. Verify the parametrizations after using the clipboard.
|
Copying & Pasting to Other Projects |
|---|---|
|
You can copy parts of a project to other projects in different program instances. However, you should not use the clipboard between different versions of VisualApplets. Some operators (e.g., EventToHost) are available only for specific platforms. If you copy such an operator to a design for a target hardware platform that does not support this operator, DRC1 delivers an according error message:
|

Undo and redo operations are possible in VisualApplets.
If you want to undo your last action:
-
Select → ( Ctrl+Z ).
If you want to redo your last action:
-
Select → ( Ctrl+Shift+Z ).
The operations require some seconds to be processed.
The project is not automatically saved.
-
To save your design, use → ( Ctrl+S ) or → (or use the according menu options / toolbar buttons).
You can save your design either in the *.vad file format or in
the *.va legacy file format. If you want to open your design in
VisualApplet version 3.3.2 or older, save your design in the *.va
legacy file format. Basler recommends to always use the *.vad file
format, if possible.
Designs saved in the *.va legacy file format are backwards
compatible, which means you can still open them in VisualApplets and you can still save
your design in the *.va file format. However, if your design in the
*.va legacy file format contains a protected user library
element, the content of the protected element isn't saved along with the design. In this
case, the user library that contains this element must be imported in VisualApplets when you want
to open the *.va legacy file format.
|
File Name and Project Name |
|---|---|
|
If you save your design for the first time, or if you use the Save as... option, the Save/Save as... dialog will offer the project name as the name for your design file. |
A design might consist of a large network of modules in several design windows. Therefore, it is very helpful to have some navigation tools which facilitate to keep track with the details of your design.
These are the most important ones:
-
Changing design windows
To change between the windows in a design, you can use → ( Ctrl+F8 ).
-
Finding a module in your design
To find a specific module in your design, you have two possibilities:
-
You can use the search options of the Module Info window. Click the Module Info tab in the information panel, and enter your search string. You don't have to enter a full module or operator name. Entering a few characters is often enough. Make sure you use the right filter for your search: Use the Name filter if searching for an individual module name. Use the Type filter if searching for the name of the operator your looked-for module is an instance of.
-
Alternatively, you can also use the Search Module window which you open via → ( Ctrl+F ). Enter your search string. You don't have to enter a full module or operator name. Entering a few characters is often enough. Make sure you use the right filter for your search: Use the Name filter if searching for an individual module name. Use the Type filter if searching for the name of the operator your looked-for module is an instance of.
-
-
Selecting a module:
To select a module in a design window, click the module.
-
Using the module menu:
To use the available menu for a module, right-click the module and choose the option you need from the menu.
