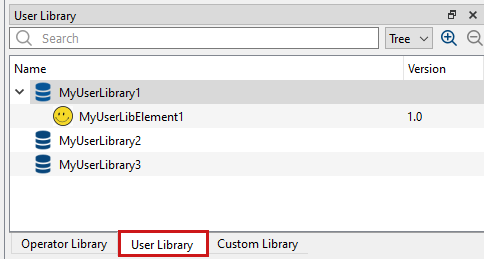
In user libraries, you can encapsulate a combination of modules which you need more than once and store this combination for later re-use.
You can define as many user libraries as you want. Each user library can contain as many user library elements as you want.
A user library element contains a specific combination of modules and links. After you create them, library elements are available in the library panel (tab User Library) and can be used like operators.
A user library element is pretty much the same as a hierarchical box (see 'Hierarchical Boxes'). The difference is that user library elements are stored in a (user-defined) user library and can be inserted into different designs and projects, just as operators from the operator libraries.
The instances of a user library element are independent from each other, that is, if you make changes to one of the instances, this has no impact on the other instances of the same user library element.
User libraries are saved as *.val or *.vl
files. These files are not part of a particular project. Thus, they can also be used in
other projects.
In the System Settings of VisualApplets, you can specify where you
want the *.val or *.vl files to be stored on your
system (see 'System Settings').
When you have inserted the instance of a user library element into a design, you do not
need the *.val or *.vl file for loading the
project or for building the applet (*.hap file).
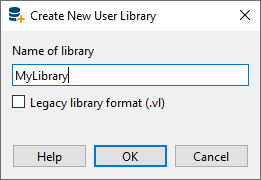
To create a new user library, proceed as follows:
-
In the library panel, click the User Library tab.
-
Right-click in the user library window.
-
From the context menu, select .
(Alternatively, you can also use the main menu → .)
-
The dialog opens up:
-
Give a name to your new user library.
-
By default, the new user library is saved in the
*.valfile format. If you want to open this library in VisualApplet version 3.3.2 or older, select . Note that if your legacy user library in*.vlfile format contains a protected user library element, this element isn't saved and can't be opened in the legacy file format. -
Click
Now, an empty user library (functioning like a container) has been created which you can fill now with your user library elements.
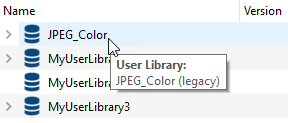
When you move the mouse over the user library name, a tooltip shows whether the
library is saved in the *.vl legacy file format:
There are two ways to create a new user library element. You can either
-
save a hierarchical box as a user library element (for general information about hierarchical boxes, see 'Hierarchical Boxes'), or
-
create a user library element from scratch (see 'Creating a New User Library Element from Scratch').
-
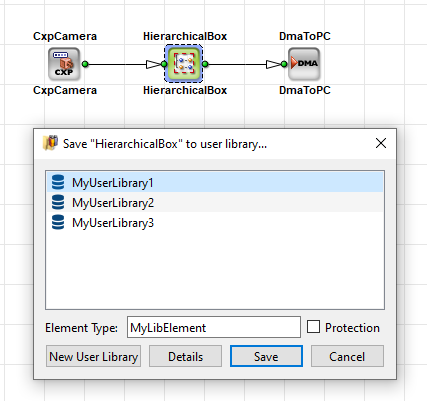
Right-click on a hierarchical box to open the context menu of the module.
-
Select .
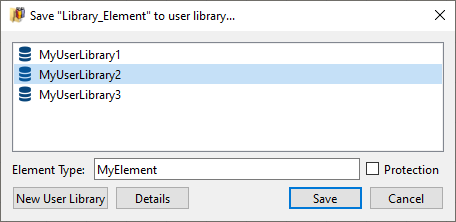
A Save dialog pops up:
-
Select the user library you want to save the new element in (or, alternatively, click on New User Library and define a new library).
-
Enter a name (under Element Type) for your new user library element.
-
Optionally: If you want to add information on your element (version number, short description, individual GUI Icon, documentation in form of HTML help files):
-
Click on . A new dialog opens:
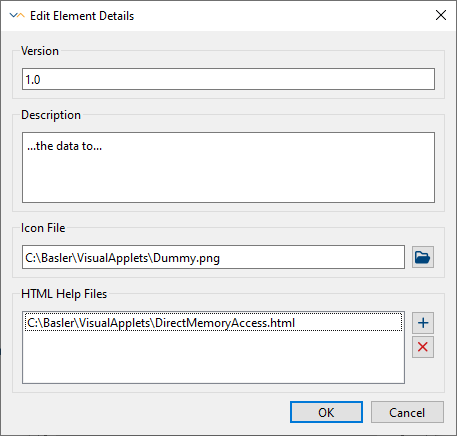
Figure 171. Adding documentation, version information, short description, and/or individual GUI Icon
-
Enter a version number for your library element if you want to.
-
Enter a short description for your library element if you want to.
-
To specify a specific icon to be displayed together with the library element on the VisualApplets GUI, in field specify the path to the PNG file or use the navigation button on the right hand side of the field.
-
To add documentation describing your user library element, click the plus button under and navigate to the HTML file that holds the text of your documentation.
You may specify multiple HTML and image files. If you add multiple HTML files, the first HTML file in the list will be the starting page of your documentation. The starting page is displayed as documentation of your user library element (in the information panel, tab Help). The additional files may contain images or further HTML files that are linked by the starting page.
![[Note]](../common/images/admon/note.png)
Naming and Storage of Help Files When you save your user library element later on, all the files you specify here will be copied to the VisualApplets installation directory, sub-directory . The starting page of your documentation (first HTML file in the list) will be renamed and will have the name of the user library element:<elementname>.html
To unlink an HTML file from the library element, select the file and click on the delete button. The HTML file will be unlinked, but remains in your file system.
-
Confirm the details specification of your new user library element with .
-
-
If you want to protect your user library element, select the Protection option. This way, the user library element is made a “black box”. (For details on element protection, see 'Protecting User Library Elements'.)
-
Click .
The optional PNG and HTML files are copied to the VisualApplets installation directory, sub-directory .
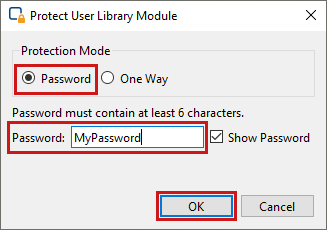
If you activated the Protection option, an additional dialog Protect User Library Element appeares.
-
Make sure protection mode is activated.
-
Enter your password and click .
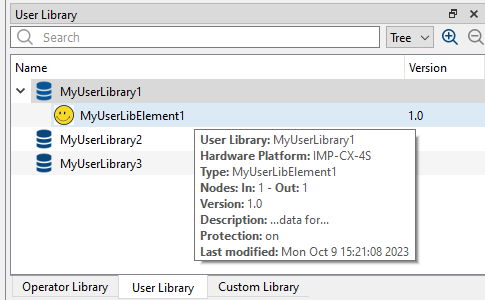
All User libraries and their contents are available in the library panel (see The User Interface of VisualApplets). Click on the User Library tab to display the User Library window.
The icon you selected is visible together with the library element.
Detailed information on an individual element is displayed in the tooltip:
If you select the new user library element, the according help information is displayed in the information panel under tab Help.
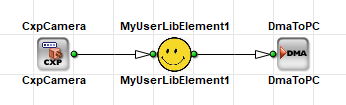
The display within the design window has changed: Instead of "HierarchicalBox", the name of the user library element is displayed. The icon for hierarchical boxes has been replaced by the icon you selected for the library element. The name of the instance within the design (below the icon) has remained the same.
-
You can change your user library element any time later on (see section 'Editing User Library Elements'. However, these changes will not be promoted to the instances of the element. You have various options for updating the instances of a user library element if you want to (see section 'Updating Instantiated User Library Elements'.
|
Analysis of User Library Elements |
|---|---|
|
Design Rules Check Level 1 is possible. Resource analysis, build, and simulation are not possible. |
Alternatively, you can create new user library elements from scratch. For defining and/or changing user library elements, you use the User Library Editor.
To define a new user library element from scratch:
-
From the main menu, select → → .
Now, the design editor closes. Together with the design editor, also the design you have been working on is closed.
The user library editor opens. The user library editor behaves like the normal design editor.
-
Define a name for your new user library element.
-
Select the target hardware platform.
(However, the platform is only relevant if you include operators in your element that are dependent on hardware issues, such as camera operators.)
-
Click .
-
As soon as you click , a dialog box opens where you have to specify the number of input and output ports of your element. Make sure you specify the right number of input and output links since it is not possible to change these numbers later on.
-
Specify the number of input ports you need.
-
Specify the number of output ports you need.
![[Caution]](../common/images/admon/caution.png)
Define necessary number of links Make sure you specify the right number of input and output links since it is not possible to change these numbers later on.
-
-
Confirm the port definition with OK.
The user library editor opens with an empty element design containing only the imput and output ports you just specified.
-
Edit the design of your user library element as you want.
-
When you are finished, save your element by selecting from the main menu → .
-
Select the user library you want to save the new element in (or, alternatively, click on New User Library and define a new library).
-
Optionally: If you want to add information on your element (version number, short description, individual GUI Icon, documentation in form of HTML help files):
-
Click on . A new dialog opens:
Figure 176. Adding documentation, version information, short description, and/or individual GUI Icon
-
Enter a version number for your library element if you want to.
-
Enter a short description for your library element if you want to.
-
To specify a specific icon to be displayed together with the library element on the VisualApplets GUI, in field specify the path to the PNG file or use the navigation button on the right hand side of the field.
-
To add documentation describing your user library element, click the plus button under and navigate to the HTML file that holds the text of your documentation.
You may specify multiple HTML and image files. If you add multiple HTML files, the first HTML file in the list will be the starting page of your documentation. The starting page is displayed as documentation of your user library element (in the information panel, tab Help). The additional files may contain images or further HTML files that are linked by the starting page.
Naming and Storage of Help Files When you save your user library element later on, all the files you specify here will be copied to the VisualApplets installation directory, sub-directory . The starting page of your documentation (first HTML file in the list) will be renamed and will have the name of the user library element:<elementname>.html
To unlink an HTML file from the library element, select the element and click on the delete button. The HTML file will be unlinked, but remains in your file system.
-
Confirm the details specification of your new user library element with .
-
-
If you want to protect your user library element, select the Protection option. This way, the user library element is made a “black box”. (For details on element protection, see 'Protecting User Library Elements'.)
Protected Elements Can't Be Saved to the Legacy File Format If you save your user library in the
*.vllegacy file format, protected elements can't be saved. In this case, either remove the protection or save the user library in the newer and recommended*.valfile format.With the legacy file format you can open the user library in VisualApplets version 3.3.2 or older.
-
Click .
The optional PNG and HTML files are copied to the VisualApplets installation directory, sub-directory .
If you activated the Protection option, an additional dialog Protect User Library Element appears.
-
Make sure protection mode is activated.
-
Enter your password and click .
All User libraries and their contents are available in the library panel (see The User Interface of VisualApplets). Click on the User Library tab to display the User Library window.
The icon you selected is visible together with the library element.
Detailed information on an individual element is displayed in the tooltip:
If you select the new user library element, the according help information is displayed in the information panel under tab Help.
-
-
If you want to proceed working on your design, close the user-library-element design and the user library editor: From the main menu, select → .
Close element design via File->Close It is not enough to close the element design by closing the tab of the design. You need to close the user library editor, too.
To close both, click → . Only after closing the design of your user library element (and thus the library editor) in this way, you can re-open the normal design editor and thus your overall applet design.
-
To continue working on your design, open your design.
You can change your user library element any time later on (see section 'Editing User Library Elements'. However, these changes will not be promoted to the instances of the element. You have various options for updating the instances of a user library element if you want to (see section 'Updating Instantiated User Library Elements'.
|
Analysis of User Library Elements |
|---|---|
|
Design Rules Check Level 1 is possible. Resource analysis, build, and simulation are not possible. |
You can create an instance of an element by a simple drag & drop into your design (as you do with operators).
The instantiated module behaves like a hierarchical box, but knows it descends from the user library.
You can adapt instances of user library elements to fit your overall design. You may need to
-
modify individual operator parameters
-
modify the layout (adding and deleting of operators and links)
![[Tip]](../common/images/admon/tip.png) |
Changing Link Properties |
|---|---|
|
Changed link properties do not change the implementation of the library element instance. Example: If a library element has been saved with a parallelism of 4, but its instance is connected to a parallelism of 8, this of course has an influence on the links inside the instance. However, this is not a change of the implementation of the instance as no operator parameters are influenced by a change of the link properties. |
After you changed an instance of a user library element - either by modifying individual operator parameters, or by modifying the layout (adding and deleting of operators and links), the instance is no more a mere copy of the user library element.
To keep you informed which instance contains changes, the modified user library element instance is marked:
This is very important for you to know, as updating the instances of a user library element (see section 'Updating Instantiated User Library Elements') overwrites the changes you made to an instance. You should always carefully consider the pros and cons before selecting an automatic update for an instance that contains changes.
You can protect user library elements. After protection has been enabled, the user library element is made a “black box”. However, protected elements that contain dynamical parameters or parameters that are referenced from an operator of the Parameters library are still visible in the runtime.
|
Protected Elements Can't Be Saved to the Legacy File Format |
|---|---|
|
If you save your user library in the With the legacy file format you can open the user library in VisualApplets version 3.3.2 or older. |
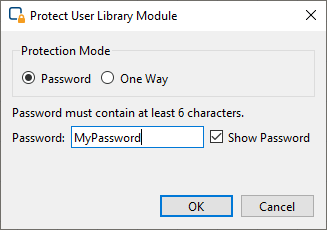
There are two ways to protect a user library element:
-
Protection via password: The user library element can afterwards be opened and edited via password. Users that do not have the password will not even be able to see which operators are used in the user library element (black box).
-
Irreversible protection: The user library element is made a black box for ever and cannot be re-opened, not even by yourself.
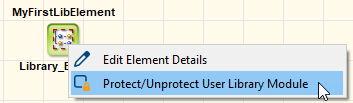
To protect a user library element via password:
-
Right-click on the element.
-
From the context menu, select .
-
Make sure protection mode is activated.
-
Enter your password.
-
Click .
|
"One-Way" Protection Irreversible |
|---|---|
|
If you select protection mode One Way (instead of Password), the user library element can never be re-opened, not even by yourself. If you plan to enhance the element at a later point of time, make sure you select protection mode instead. Alternatively, you can save a copy of the element (as a hierarchical box or a non-protected operator) before enabling this protection mode. |
You can make changes to your user library elements. You can do this by either
-
editing the library element itself in an library editor, or by
-
overwriting it with a changed instance or a hierarchical box.
However, these changes are not propagated automatically. If you want an instance of a library element to reflect the changes you made to the element, you need to update the instance (see section 'Updating Instantiated User Library Elements').
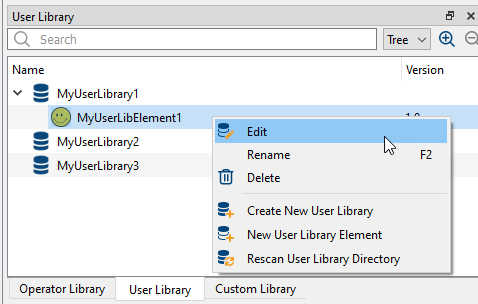
You can edit your user library elements in the user library editor. To open the user library editor:
-
Save the design you are currently working on.
-
In the library pane, go to tab User Library.
-
Right-click the element you want to edit.
-
From the context menu of the element, select .
Now, the design editor closes. Together with the design editor, also the design you have been working on is closed.
The user library editor opens. The user library editor behaves like the normal design editor.
-
Make your changes.
-
Save your changes.
If you want to edit the element description and version number:
-
From the main menu, select → .
-
Save the edited element.
Analysis of User Library Elements: You can carry out Design Rules Check Level 1. However, bandwidth analysis, resource analysis, build, and simulation are not possible.
![[Important]](../common/images/admon/important.png) |
Updating Instances |
|---|---|
|
When you make changes to user library elements, the instantiated elements in your designs are not updated with these changes. If you want an instance of a library element to reflect the changes you made to the element, you need to update the instance (see section 'Updating Instantiated User Library Elements'). |
Alternatively, you can edit a user library element by simply overwriting it. To do so:
-
Save a hierarchical box or an instantiated user library element under the name of an already existing user library element (as described in 'Saving a Hierarchical Box as a User Library Element').
|
Updating Instances |
|---|---|
|
When you make changes to user library elements, the instantiated elements in your designs are not updated with these changes. If you want an instance of a library element to reflect the changes you made to the element, you need to update the instance (see section 'Updating Instantiated User Library Elements'). |
In the following sections you get information on how to update instantiated user library elements.
In the normal workflow, it happens that user library elements need to be updated. The changes you make to an element, however, have no influence on the instances of this element. To update the instances of an element in your design(s), you can either add your changes manually, or use one of the two update mechanisms provided by VisualApplets (see below).
If you decide to update the instances of the changed element manually, you can select multiple instances of the element in your design and change them all simultaneously in one step.
|
No Hierarchical Update |
|---|---|
|
Hierarchical update of user library elements is not supported. If you select more than one module of a hierarchy for updating, only the highest module of the hierarchy is updated. |
You can update the instances of a user library element in a design via the function Quick Update.
|
Updating Overwrites Changes within Instances |
|---|---|
|
Updating the instances of a user library element overwrites all changes you made to an instance (parameter settings, or adding/deleting operators). You should always carefully consider the pros and cons before selecting an automatic update for an instance that contains changes. To keep you informed which instance contains changes, modified instances of a library element are marked: 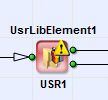
|
To update the instance of a library element via Quick Update:
-
Select the instance you want to update.
-
From the main menu, select → .
The selected instance of the element is replaced by a new one that reflects the changes you made to the element in the library.
Quick Update is only possible if the instances you want to update have the same number of input and output ports as the edited user library element. It is not possible to use Quick Update for replacing the instance of a user library element type A by an instance of user library element type B.
Via Quick Update, you can update multiple instances of an element at once:
-
Press the Ctrl key and hold it pressed while you select all instances you want to update.
-
From the main menu, select → .
All selected instances of the element are replaced by new ones.
When you select this option, the instances you want to replace do not have to be of the same type as the library element they are updated with. Thus, you can use this option to replace instances of user library elements or hierarchical boxes by the instance of another user library element. For example, you can replace the instance of a user library element type A by an instance of user library element type B (in contrast to option “Quick Update”). Nevertheless, also is only possible if if the instances you want to replace have the same number of input and output ports as the user library element you want them to replace with.
To replace one or more instances of an element by instances of another user library element:
-
Select the modules you want to replace (holding the Ctrl key).
-
From the main menu, select → .
The dialog window Update User Library Elements opens. The left-hand panel shows the module(s) you have chosen for update. The right-hand panel shows your user libraries.
-
In the right-hand panel, select the user library element you need. In the left-hand panel, all modules which can be replaced as you desire are highlighted in green (if not, check if the numbers of inputs and outputs fit).
-
Click .
Instantaneously, all listed modules with matching numbers of nodes are replaced by instances of the new user library element.
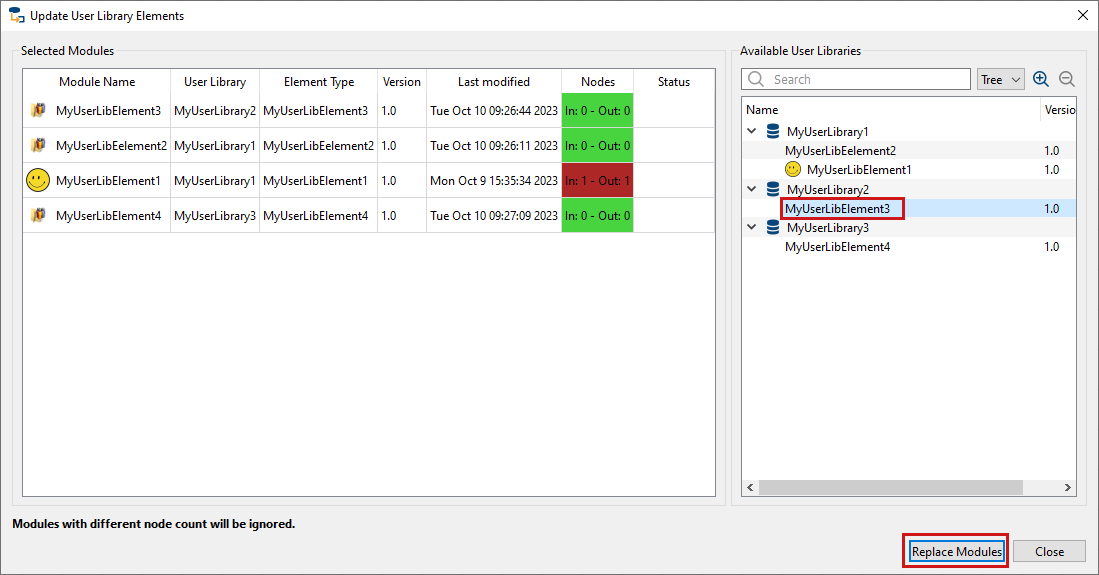
Example above: The numbers of inputs and outputs do not fit in two cases. Module 28 has only 1 input and 1 output port, whereas USRLibraryELement5 has three inputs and three outputs. Replacement of modules 32, 31, and 33 by USRLibraryELement5 is possible as they have exactly the same number of input and output ports as USRLibraryELement5.
Sometimes you might find it helpful to unlink an element instance from the user library. To do so, you can transform instances of user library elements into hierarchical boxes.
-
Select the module you want to transform in your design. (If you want to transform more than one module, press the Ctrl key and select all modules you want to transform.)
-
From the main menu, select → .
Instantaneously, all selected modules are transformed into completely independent hierarchical boxes.
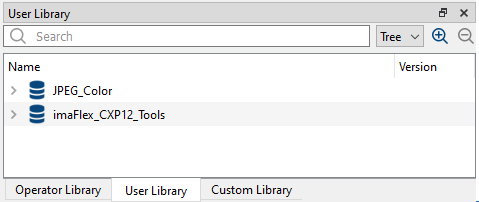
The VisualApplets delivery contains two user libraries:
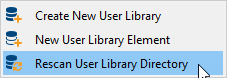
If you don't see these delivered user libraries, right-click into the User Library panel, and select from the context menu that opens up:
VisualApplets then opens the libraries that are located in the directory specified in → → .
The JPEG_Color user library contains the following elements:
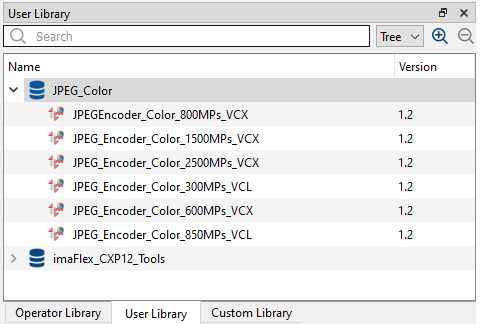
-
JPEGEncoder_Color_800MPs_VCX: With this user library element you can convert 8-bit color images into JPEG images. JPEG_Encoder_Color_800MPs_VCX is for CXPx2 frame grabbers and provides a bandwidth of 800 MP/s at a clock rate of 160 MHz. The input parallelism is 8.
-
JPEGEncoder_Color_1500MPs_VCX: With this user library element you can convert 8-bit color images into JPEG images. JPEG_Encoder_Color_1500MPs_VCX is for CXPx2 frame grabbers and provides a bandwidth of 1200 MP/s at a clock rate of 160 MHz. The input parallelism is 8.
-
JPEGEncoder_Color_2500MPs_VCX: With this user library element you can convert 8-bit color images into JPEG images. JPEG_Encoder_Color_2500MPs_VCX is for CXPx4 frame grabbers and provides a bandwidth of 2400 MP/s at a clock rate of 160 MHz. The input parallelism is 16.
-
JPEGEncoder_Color_300MPs_VCL: With this user library element you can convert 8-bit color images into JPEG images. JPEG_Encoder_Color_300MPs_VCL is for Camera Link (CL) frame grabbers and provides a bandwidth of 300 MP/s. The input parallelism is 4.
-
JPEGEncoder_Color_600MPs_VCL: With this user library element you can convert 8-bit color images into JPEG images. JPEG_Encoder_Color_600MPs_VCL is for Camera Link (CL) frame grabbers and provides a bandwidth of 600 MP/s at a clock rate of 155 MHz. The input parallelism is 4.
-
JPEGEncoder_Color_850MPs_VCL: With this user library element you can convert 8-bit color images into JPEG images. JPEG_Encoder_Color_850MPs_VCL is for Camera Link (CL) frame grabbers and provides a bandwidth of 850 MP/s at a clock rate of 170 MHz. The input parallelism is 8.
You find detailed documentation for the user library elements in the Help panel of your VisualApplets installation.
|
Rather Use the imaFlex_CXP12_Tools_Advanced User Library |
|---|---|
|
The imaFlex_CXP12_Tools user library is only delivered for backwards compatibility reasons. If possible, use the imaFlex_CXP12_Tools_Advanced user library instead. |
The imaFlex_CXP12_Tools user library contains the following elements:
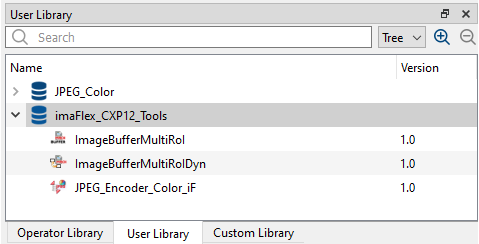
-
ImageBufferMultiRoI: This operator provides support for multiple regions of interest (ROI) for each buffered image. The user library element ImageBufferMultiRoI as tool element for imaFlex platform provides the same functionality as the VisualApplets standard operator ImageBufferMultiRoI, which is not supported on imaFlex platform.
-
ImageBufferMultiRoIDyn: This operator provides support for multiple dynamic regions of interest (ROI) for each buffered image. The user library element ImageBufferMultiRoIDyn as tool element for imaFlex platform provides the same functionality as the VisualApplets standard operator ImageBufferMultiRoIDyn, which is not supported on imaFlex platform.
The imaFlex_CXP12_Tools_Advanced user library contains the following elements:
-
FrameBufferMultiRoi: This operator provides support for multiple regions of interest (ROI) for each buffered image. The user library element FrameBufferMultiRoi as tool element for imaFlex platforms provides the same functionality as the VisualApplets standard operator ImageBufferMultiRoi, which is not supported on the imaFlex CXP-12 platforms.
-
JPEG_Encoder_Color_iF_Penta: JPEG_Encoder_Color_iF_Penta allows you to convert 8-bit color images into JPEG images.
-
JPEG_Encoder_Color_iF: JPEG_Encoder_Color_iF allows you to convert 8-bit color images into JPEG images.
You find detailed documentation for the user library elements in the Help panel of your VisualApplets installation. Also, there are examples available that show you how to use the user library elements, see 'Basic Acquisition Examples for Cameras for CoaXPress 12 imaFlex Frame Grabber'
